Vegetables Every Day

Vegetables Every Day
Carrot Tarator with Beets

Wednesday, August 16, 2017

Just Enough: Apricot Clafouti


I have been planning to post this recipe for a while (apricots where in season a month or two ago?) because it is so easy to make and just hits the spot for me for dessert -- full of fruit, not too sweet, and a texture that is fun -- halfway between a cake and a custard. 

It's pretty much the same recipe as the Fig Clafouti I posted a few years ago, one talking about abundance. This recipe is just enough for 2.  Well, really it's a lot for 2, but we always manage to eat the whole thing!   


This is really just a 1/2 recipe of the Fig Clafouti, with a couple of tweaks.  To adjust for the apricots, I changed from orange liqueur to Amaretto, because I think almonds and apricots are a good combo.  To get fewer dishes dirty, I use the immersion blender instead of the mixer (but you could still use a mixer if you don't have an immersion blender ... or you could even do with a whisk).  I have also included weights for ingredients... this further cuts down on dishes as you don't need measuring cups!   The baking time is cut down a bit, as this will depends on the thickness as much as the size, as well as your oven, so best go more by how this looks than by time.   


Figs are back in season, so I will be making the fig version this weekend.  In the fall, I'm planning to try with pears.  And someday, I will do with cherries... which is the fruit traditionally used for a clafouti!

Apricot Almond Clafouti for 2

½ lb fresh apricots, pitted and quartered if large, halved if small
2 tablespoons almond liqueur (like Amaretto)
½ lemon
Butter

1 large egg
2 tablespoons (1 ounce) sugar
3/8 cup (3 ounces) milk
1/4 cup (1¼ ounce) flour
Pinch salt
2 teaspoons sliced or slivered almonds

Combine the apricots and liqueur in a small bowl.  Add grated zest from ½ the lemon, plus about 1 teaspoon of lemon juice to the apricots.  Stir and let sit for an hour or so if you have time. 

Preheat oven to 350F (or 340F convection bake).  Coat a 5-6” diameter baking dish (or something similar) with butter.  Pick the apricots out of the bowl (leaving the syrup) and place into prepared pan.  

Combine the eggs and sugar in cup for immersion blender.  Mix with immersion blender until pale yellow, this will take a minute or so.  Add milk, flour, salt, and reserved syrup, mix to blend.  Pour the batter over the apricots, then sprinkle with almonds. 

Bake until puffed and golden, 35 - 45 minutes (or 30 minutes on convection bake). The clafouti should be puffy, browned, and not jiggly.   Let cool about 20 minutes to serve warm.  

Wednesday, July 19, 2017

Curried Lentils


I'm thinking that Trader Joe's should be sponsoring me. 


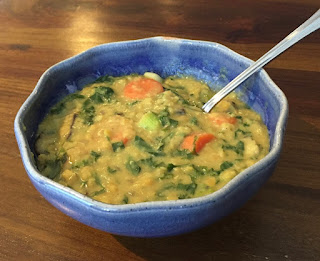
This take on beans and greens has quickly become a favorite.  It has a flavor profile that's different from a lot of what I make, and its really quick to put together.  I like curry, but certainly not an expert.  I do know that curry powder is a mix of spices, and that your grandmother from India wouldn't be using some mix out of a jar.  But, so far, I have made this with 3 different kinds (ranging from the above Trader Joe's curry powder to one I bought in London) and they have all been good... although maybe not authentic. I'm guessing a canned curry paste will work too. No matter what kind of curry you use, realize the heat level between brands can vary considerably.  If in doubt, use less, as you can always add some more at the end.  

Besides the curry, what makes this different from my normal lentil soup is coconut milk, it adds a nice richness (and keeps you from noticing there is no meat). And to my friends in Arizona:  even though this is a stew, it's still good to eat on a warm day. 


And like other lentil or bean stews, this freezes very well.  I just put 1 serving into a 1 quart ziploc freezer bag, press out the extra air and seal.  Freeze flat.  When ready to eat, put the bag into a bowl (or sinkful) of hot water.  When thawed (about 5 - 10 minutes), dump into a bowl and heat a couple of minutes in the microwave.  And then garnish.


Freezer Ready


Curried Lentils

6 servings

1 tablespoon oil  
1 large onion, chopped
3 to 4 carrots, sliced 
2 - 3 cloves of garlic, minced
2 - 3 teaspoons minced fresh ginger
1 teaspoon salt
~ 2 tablespoons curry powder (to taste)
1 pound red lentils (or regular green lentils), rinsed
4 cups of water
1 can (13.5 oz) coconut milk
1 bunch of greens (kale, mustard, chard), large stalks removed, chopped, or a bag of baby arugula.

Garnish:  Chopped avocado, yogurt, cilantro, fried egg, and/or lime wedges

Heat the oil in a large pot.  Sauté onion, carrots, garlic, ginger, and salt until onions are translucent.  Add curry powder, stir well, and then add lentils, 4 cups water, and coconut milk.   Cook about 30 minutes, add a bit more water if needed to just cover the lentils.  The red lentils should break down, or green lentils should be soft.  Add chopped greens.  Kale or mustard greens need to cook about 5 minutes; baby arugula is done as soon as you have stirred it in.   Taste -- add salt or more curry, if needed.    

Garnish with chopped avocado, yogurt, cilantro, and/or lime wedges.  To make hardier, add a fried or poached egg, or serve over rice. 


Sunday, June 18, 2017

No-Knead Whole Wheat (or Rye) Sandwich Bread


Buying good bread seems harder ... and more expensive ... than it should be.  Making your own bread is cheap (the cost for ingredients for this recipe is less than 50 cents!) and good. But for most of us, baking bread, doesn't fit into our modern lifestyles.   Using traditional methods, there is the kneading (or cleaning of the stand mixer), then the "being around" for a good 4 or 5 hours for it to rise, punch down, rise again, form, rise again, bake.  So through some internet searching and experiments, I have put together the following recipe, which makes 1 loaf.  It takes just one bowl and no kneading. It's mostly whole wheat, although you can use all bread flour or a combination of bread flour and AP flour.  You can also use some rye flour for a change of pace. The flavor is nicely developed by the use of some sourdough starter and a long rise in the fridge, so you don't need to be around for 5 hours straight. You do need to be around a couple of hours for the final rise and bake, but that seems manageable, at least for me.  As with all yeast products, the rise time will vary with kitchen temperature...  if the kitchen is warm, the rise times will be shorter. 

Typical timing to make the bread: 
Before bed - get Blob (the sourdough starter) out of the fridge
Next morning - feed blob
Before lunch -- make dough (and replenish Blob)
After lunch - put dough and Blob in the fridge
The morning of the day you want fresh bread - get dough out and form loaf, let rise and bake...


Whole Wheat (or Rye) Sourdough Sandwich Bread

150 g sourdough starter (see below for care and feeding of a starter)
400 g water                          
1 teaspoon active dry yeast
2 teaspoons sugar
100 g bread flour
400 g white whole-wheat flour, or 100 g rye flour plus 300 g www flour
1 ½  tsp salt
Olive Oil

In medium-large bowl, combine sourdough starter, water, yeast, and sugar.  Stir with a sturdy spoon (or dough whisk) to mix.   Add the flours and salt, and give a very good stir (a minute or so).  The dough will be soft and sticky.  Let rise at room temperature for about 1 hour, and then put in refrigerator for at least overnight, and up to 5 days. The dough will get more sour with more time.


When you are ready to bake, take bowl out of refrigerator.  Prepare a 9” x 5” pan by oiling (rub around about a 1 teaspoon or so of olive oil) and flouring.   Scrape the dough on to a floured surface (like the kitchen counter), then pat into a rectangle about the size of the bread pan. Handle the dough gently, with as little flour as needed to keep from sticking to hands and counter. Stretch the dough to 3 times the width of the pan (so about 9” x 15”). Fold the dough into thirds, like a letter. Turn 90 degrees, and stretch dough the long way, to (so about 5” x 27”), and fold into thirds.  Turn one more time, and do it again like the first time. When you are done, it should be about 9” x 5”.  Pinch the seams, and put into the pan, seam side down.  Cover and let rise for 1 hour, or until doubled in bulk.

Preheat the oven to 450 oF (this takes a good half hour, so start the oven 30 minutes after the bread is in the pan).   Use convection bake if you have it.

Score the top of the loaf with a sharp paring knife about ¼” deep, then place the pan in the oven and bake 10 minutes. After 10 minutes, reduce the heat to 350 oF and bake another 40 - 45 minutes.  Bread is done when crust is golden, internal temperature should be at least 190 oF (and 200 oF or higher is OK).

Unmold by turning out the loaf to a rack. Let cool completely before slicing.

Also... Sometimes I will make a smaller loaf in a 5 x 5 pan, this uses half the dough (and about 5 or 10 minutes less to bake). That is what I am showing in the pictures.  More work, but fresh bread twice a week!  


Care and feeding of a starter:

My starter is nicknamed Blob, and he’s been around for about 8 years now. It's what I use to make pizza dough too.  If you want some, just let me know!  These instructions assume you have some of Blob to start with.

Blob needs to be fed every week or two.  I use the following method so that I don’t have to throw any starter out (assuming I am making dough).   In between using, he stays in the refrigerator.  A couple of notes:  You want to use non-chlorinated water… tap water that has been through a filter is OK or bottled water.   This is what they call a 50% hydration starter, so you always use the same weight of flour and water.  I generally err to the side of too much flour.  

At least 6 hours before you want to make dough, pull Blob from the refrigerator to warm up (or do the night before).  After it’s up to room temperature (2 or 3 hours), or the next morning, add 1.5 ounces of all-purpose flour and 1.5 ounces of water, stir well to combine.  Let sit for another 3 hours or so, it should be nice and bubbly and ready to make dough.  After you take enough out to make the dough, add another 1 ounce of water and 1 ounce of flour, stir well, and let sit until its bubbly again (3 hours). If you have used more than 5 ounces to make the bread (including what you lose on the spoon), increase the amounts accordingly.   It’s ready to go back into the refrigerator.   Every so often, transfer Blog to a clean container. 

If Blob gets a little gray around the gills (like if he has been neglected for a few weeks), feed a couple of times, throwing out the excess. As long as it gets happy and bubbly again, its fine.  If it gets pink or other colored, I would start over. 

Sunday, May 7, 2017

Potato Hash


I think I finally have a theme for a cookbook: 1-Skillet Dinners.  At least once a week I make something that falls into this category:  Stuffed Quesadillas, Fried Rice, FrittataSautéed Chickpeas, Scrambled Eggs.    Here is another one to add to the list:  Potato Hash.  Like the others on this list, it's a vehicle to use up miscellaneous veggies in the fridge, maybe left-over meat, and quick to put together.  To make a cookbook, I would just have to do ten versions of each of these...  The Meat-lovers, The Vegetarian, The Superfood version (i.e.salmon, kale and quinoa), then the seasonal versions, Winter, Spring, Summer, Fall.  Then maybe fill it out with a gluten-free vegan challenge...

Of course, it seems silly to actually follow a set recipe for this type of a meal, as one of the things that makes these quick to make is not having a "real" recipe, where you would measure and have to have specific ingredients.  Would love some feedback on this... Do you like to make it up with some basic guidelines, or a "real" recipe?

Potato hash has always been one of my favorites, but it didn't often make into the rotation, since you traditionally start with cooked potatoes (whole boiled potatoes), which I rarely happen to have in my refrigerator at 6pm when I want to make dinner.   But then I stumbled across a shortcut in the Serious Eat Blog that really works:  par-cook cubes of potatoes in the microwave.  You just cube the potatoes, put them on a dinner plate, cook for a few minutes, then into the skillet.  You can use any kind of potatoes. Russets are usually, recommended, but have been happy with red, gold, and even sweet potatoes.  I even mix potatoes if I have a bunch of small ones.


So, like the other dishes in this series, I am just giving some guidelines, not a "real" recipe.  Feel free to improvise and adjust to your taste, and what you happen to have around!

As to quantity, look at the amounts of each component to decide how much you want to eat.  Double if cooking for two, adjusting plus or minus for how much they eat compared to you. I don't ever make this for more than two, since my skillet isn't big enough (I like to use a non-stick skillet, and the biggest one I have is 11 inches").  It does look like a big pile when you start, but it shrinks some when it cooks.   I like this best with broccoli or greens like swiss chard or kale, but use what you like.  I do always use some onion (or a shallot, or green onions), and most always red bell pepper.  Meat is optional.


And last, I like to top this with something. Usually it's a fried egg (done in the same skillet, it just takes a couple of minutes after the hash is done), but sometimes shredded cheese, and/or a half an avocado.  Chopped herbs will make it seem fancy.  And ketchup is a traditional topping, although honestly I don't even have any in the house.

So, here is a start, improvise to your taste!

Potato Hash

One serving, double for two

Any kind of oil, or bacon grease (about a tablespoon)
Enough potatoes (about 1 medium-large russet or equivalent amount of any kind of potatoes)
   If you have boiled potatoes, skip the microwave step…
Salt
Pepper
¼ of a an onion, diced
Red pepper flakes

Veggies:
¼ of a bell pepper (any color, but I like red best)
A good handful or two of a green vegetable or 2:  Broccoli (small florets), or any kind of greens (kale, swiss chard, spinach), or diced zucchini.  Leftover roasted or steamed veggies are OK.
Other options: mushrooms, sun-dried tomatoes

Optional:  Bacon, ham, or leftover chicken, any kind of leftover grilled or roasted meat.

Toppings:  Egg, and/or shredded cheese, avocado, chopped herbs, sour cream, ketchup

Dice potatoes, place in a single layer on a plate, then microwave for 2-3 minutes per serving.  They don’t need to be cooked through, but good and hot and have lost the raw crunch. Taste a cube to check.  Careful – the plate can get hot.

If using bacon, slice the bacon into half-inch pieces, then put into a 10 – 11” nonstick or cast iron skillet. Add a little water (a couple of tablespoons or so, this will keep it from spattering), and turn on medium-high heat.  Cook until the bacon is crisp.  Remove bacon and leave the grease.  If not using bacon, heat a tablespoon or so of your favorite oil (enough to nicely coat the bottom of the pan) over medium-high heat.

Add the potatoes to the hot skillet, sprinkle with a good shake salt, and a big grind of pepper.   Shake, then let brown.  If you are using mushrooms, add them now.  Once one side of the potato cubes are brown (this takes a five minutes or so), toss, then add the red pepper flakes, onions, bell peppers, and any longer cooking greens (like raw broccoli or zucchini).  Just leave them on top to start cooking as the potatoes continue to brown.  Toss again, now cooking/browning everything in earnest.  Add study greens like kale at this point.  When it’s almost done add any meat, sun dried tomatoes, or leftover veggies (just want to heat through, not really cook), and tender greens, like baby spinach.  Add more salt and pepper to taste.   Remove to serving plate(s) or a dinner bowl(s).   If using an egg to top, add a bit more oil (or butter) to the pan, and quickly fry the egg.

Add the egg to the top, along with other optional toppings – bacon, cheese, avocado, herbs, etc.


Saturday, January 28, 2017

Stuffed Quesadilla


One of the current fads is #cook90...  basically it's a program to cook 90 meals in a month (breakfast, lunch, dinner), combined with a relentless stream of pictures posted on social media tagged #cook90.  Most people choose to do it in a month with 31 days, so there are a few passes.  I kind of snicker at this, because I guess that I typically "cook" over 80 meals a month.  The idea is mostly centered on not eating out, and the rules are pretty loose on what constitutes cooking (assembling a group of things counts, like yogurt, fruit and granola).

So while I snicker, there is a real challenge in finding a good combination of interesting, tasty, good-for-you food on the table day after day, and minimizing how  much time you spend in the kitchen cooking and cleaning. Because even if you enjoy cooking, there are days you just don't have the time or enthusiasm to do it.  For those days, you need to have a few go-to's that are quick and tasty. Leftovers can fit that bill, but that gets old.  And a lot of times, I have bits of things, not enough to make a full meal. And sometimes you need to be able to put something together from pantry staples. Quesadillas fit either of these scenarios.

And when you stuff quesos with more than just cheese it makes a hearty healthy-ish meal.

I typically start with some kind of extra protein -- most often, black beans (from a can - drained and rinsed) but sometimes leftover meat, then add some vegetable (pretty much any leftover cooked vegetable, roasted anything is especially good), or maybe raw green onions or red bell peppers (thinly sliced). Sun dried tomatoes add a nice pop.  I usually use sharp cheddar cheese, but sometimes use a mix of small bits of cheese that need to be used up, or will add some goat cheese.  And I like a little spice -- usually just some red pepper flakes, but roasted chilis are traditional (for good reason), or diced raw jalapenos.  I tend to avoid canned green chilis as they just seem too wet.

These go together quick, so it's best to get everything assembled before you start cooking. You can use any size tortilla, just accommodate the volume of toppings to tortilla size. I have never tried the "alternative" tortillas (like the colored wraps, or low fat, or whole wheat..), so I don't know how they work. For a large tortilla, I use a "big handful" of cheese (about 2 ounces), a small handful of meat or beans, and a handful of veggies.


I put a little oil (any kind) in a skillet large enough to accommodate the flat tortilla and turn the heat on medium high.  You want just a very thin layer of oil.


When the skillet is warm (don't need to wait until its hot), put in the tortilla and quickly turn with your hand to evenly spread the oil.  Then start building:  spread the cheese over the entire tortilla.  Add the meat or beans on one size.  Add the veggies to the other side.  Add any other add-ins, like sun-dried tomatoes or chili's to which ever side is less full.  Add goat cheese (or even something like a bit of blue cheese) if that is what you want.  Wait for the cheddar cheese to melt.   Here are a couple of examples of what the assembled queso's look like:

Black bean, goat cheese, sun dried tom, green onion 

        Lamb, roasted veggies, sun dried tomatoes


When the cheese is melted, check underneath to see if the tortilla is browning.  When it looks like this, fold in half.

It's usually best to fold the veggie side onto the bean or meat side.  Press the folded queso with your spatula, and brown a bit more on each side.   When nicely golden brown, remove to a cutting board and slice into wedges.  Serve with garnish of choice -- avocado, salsa, a sprinkle of herbs, or maybe a salad.    If you go on to make a second queso, note that it will cook much faster -- be ready to turn down the heat.   I usually add a tiny bit more oil, and don't twirl the tortilla in the pan (or be really quick, as it's really hot fast).  

 Enjoy! 

Sunday, January 15, 2017

Preserved Lemons


As many of you know, I have a large old lemon tree in my backyard, and always on the lookout for things to do with lemons.  Lots of lemons.  You can only drink so much lemonade.  So I decided to try making preserved lemons, which are a traditional food in North Africa (think a Moroccan tagine)... and when you have a giant jar of them in your refrigerator (not small expensive jars from a gourmet store) you start experimenting.  And now I get cravings for them, even though I have not tried making tagine yet!

Traditionally, to make preserved lemons, you "almost" quarter the lemons, then stuff with salt, then stuff the lemons in a jar.  This seems like a lot of bother.  Then I stumbled on this recipe where you just quarter the lemons... Eureka!  Actually, the recipe was for Meyer Lemons, but works just fine on Eureka lemons.  Next I am going to try with limes (and do a smaller batch).   Here is my short version of the recipe, click through the link for more details.

Preserved Lemons

15 lemons: quarter 12, the remaining 3 will be juiced
1 ½ cups Diamond Kosher Salt

Mix lemon quarters and salt in a large bowl.  Let sit at room temperature about 1 hour.
Tightly pack lemon quarters into a large 2 quart jar.  Use lemon juice to just cover (note – I use pickle weights to help hold down the lemons).

Let the jar sit at room temperature for about 7 days until lemon rinds are glossy and look translucent all the way through, then refrigerate.    They will be good for many months, at about a year they start getting mushy.
_____________________________

So, what do you do with them?  The first key is to rinse off each piece when you are ready to use it, and remove the pulp... you just use the lemon rind (the pulp is pretty mushy and super salty, although there are some recipes that call for it), and usually dice into small pieces.  They have a bright, briny pop, and use them like you might use capers or olives.  You can add to most any pasta or grain salad, I also like them with green salads that have fish in them.  I sometimes throw them into the Chickpea and Vegetable Saute.   They go great on roasted vegetables.  I haven't tried this recipe yet, but it looks good:  Roasted Carrots with Lemon.

If you want to do something a bit more fancy (and unusual), try this recipe, inspired by El Farol: Tapas and Spanish Cuisine by Chef James Campbell Caruso (one of those cookbooks where every recipe I have tried is really good):

Preserved Lemon Goat Cheese Spread

1 large head of garlic
2 tablespoons olive oil
8 ounces soft goat cheese (such as Silver Goat), at room temperature
1 tablespoon chopped preserved lemons (just the rind part)
1 tablespoon chopped fresh mint
2 tablespoons chopped fresh parsley

Roast the garlic:   Preheat oven to 350F (can do in toaster oven).  Cut off the top of the garlic. Set the garlic in the center of a square of foil, drizzle with olive oil so that oil runs into the cloves.  Bunch (scrunch) the foil around the garlic head, leaving a bit of an opening then bake for 35 – 45 minutes until cloves are nice and soft.   Let cool.

Mix the remaining ingredients in a small bowl with a wooden spoon.  Slip the garlic cloves out of the skin and add to the bowl.  Mash them a bit on the edge of the bowl (you may or may not want to add the whole head depending on how big it is) then stir together.    Refrigerate the mixture for at least an hour to let the flavors meld, but let sit at room temperature for 20 minutes or so before serving so that is spreads more easily.

Serve on warm bread, crackers, or crudité.
______________________________

And last, if you want to go the trendy route with kale and a home-fermented food, try this salad, which was inspired by my favorite salad at our local chop house, Stake. While they do have good steaks, we are much more likely to go there and just have a flatbread and salad, or a roasted vegetable outside on the balcony... along with a nice bottle of wine.
Kale Salad with Almonds and Feta

Per person for a main dish salad: 

¼ cup almonds – either slivered blanched almonds or coarsely chopped whole almonds
Handful of kale ~ 4 leaves, thick ribs removed and cut into thin slices (1/4 inch or so)
Handful of cabbage – cut into ¼ slices, each about an inch or two long
1 quarter of a preserved lemon (peel only), diced
1 ounce feta cheese, crumbled
1 small carrot (optional) – 1/8 inch julienne or shredded
¼ cup chickpeas (optional) – plain or roasted
¼ of an avocado (optional) – diced.
Olive oil
Lemon juice – about ½ a lemon
Pepper
Salt

Roast almonds:  place on foil on a pan and toast in a toaster oven until light brown.  Alternatively, roast in a small skillet over medium heat, tossing frequently.  Or start with roasted almonds.

Massage kale leaves with a tablespoon or so of olive oil and a sprinkle of salt.  Let sit while you chop the remaining vegetables.  

Add the cabbage, preserved lemon, cheese and optional ingredients.  Add the almonds (they should be slightly cooled). Toss.  Add the lemon juice and a good grind of pepper, toss some more.  If the salad looks dry, add another bit of olive oil.  Taste to determine if more salt is needed (the preserved lemon and feta are pretty salty, so more salt may not be needed).  Serve in a handmade bowl.
________________________________