Vegetables Every Day

Vegetables Every Day
Carrot Tarator with Beets

Saturday, December 20, 2014

Merry Christmas!


The tree is decorated and most the presents are wrapped, 


The dining room is even decorated this year. 

I'm looking time with my husband, family, and friends over the next couple of weeks. Tomorrow night we are planning to see the San Diego Bay Parade of Lights (boats are decorated in Christmas lights), we have tickets to see the "Festival of Christmas" at Lamb's Theater, and the weather should be nice enough for some beach time.  

Today I'm having a fat fest in the kitchen.  There was almost a pound of butter out to come to room temperature to make cookies, and (this is a first) I am rendering leaf lard.  


There is a local pork producer, Cook Pigs, in nearby Julien that is now selling pork retail.  It's pastured pork, that eats lots of acorns and avocados.  I have a roast in the freezer for Christmas dinner, and on a whim got some lard too (actually it was pork fat, it's not lard until you render it).  Lard is the newest healthy fat.

Most of the year, I make one kind of cookies... oatmeal cookies.  But Christmas just isn't Christmas without sugar cookies.  It's something I remember making every year with my mom.  This year I'm making 3 different cookies, and made all of the dough this morning. One of them I actually baked, the other 2 are refrigerator cookies that I can bake later to have a constant sugar infusion supply of fresh cookies.  


The cookie I actually baked are biscotti, using the Michael Ruhlman recipe.  These are not hard and dry like as most biscotti.  I added some bittersweet chocolate (about a half cup or maybe a little more), a scant 1/2 cup of toasted pecans, and a 1/4 cup of dry cranberries.  

I also made World Peace Cookies.  These are super chocolaty, with a nice hit of salt.  And really easy to make.  I didn't have Dutch process cocoa and just used what I had, natural cocoa. Dutch Cocoa is darker and has a more neutral pH (natural cocoa is slightly acidic) which can throw off some recipes, but the swap works just fine here.  Also, the cocoa needs to be sifted to get out the chunks, but don't use a can type sifter because you will never get the cocoa out.  Best to use a wire strainer.


And of course I made sugar cookies.  These are not your typical sugar cookies.  The recipe came from Harriet, who I think was a neighbor of moms at the house I was born at.  They are the only kind of sugar cookies I ever eat (I learned early on I didn't like any other sugar cookies). They are very thin and crisp, you don't want to put icing on them as they would get soggy.  I usually just decorate with chocolate chips and nuts, but sprinkles and colored sugars are pretty.  They are also hard to roll... The dough needs to be cold, and you should work quickly.   Here is the dough just after making, the one on the left is wrapped in plastic, the other is not... its very sticky at this point!


I think I will wait until mom is here to make them!  Just a couple of more days.

Sugar Cookies

2 cups flour
½ teaspoon baking powder
½ teaspoon baking soda
½ teaspoon salt
2/3 cup butter, softened
1 cup sugar
1 egg, beaten
½ teaspoon vanilla
½ teaspoon lemon or almond extract
4 teaspoons milk
Decorations – sprinkles, nuts (slivered almonds are a favorite), chocolate chips, etc.

Sift together flour, baking powder, soda, and salt.  Cream butter and sugar.  Blend in egg, extracts, and milk.  Blend in dry ingredients.  Make 2 large patties, wrap in plastic wrap and refrigerate for at least 2 hours.  

Preheat oven to 350oF.  Roll 1/8 inch thick on lightly floured board. Cut into shapes with cookie cutters and transfer to ungreased cookie pans.  Don’t re-roll the dough more than once (and I find the cookies made from the space between the cutouts are just as beautiful as the cut shapes).  Using parchment paper will assist with clean up.  Decorate as desired.  Bake for 10 – 12 minutes, until just starting to brown.  


Ethan can't wait.

Monday, December 8, 2014

Cooking for One: Fried Rice

December is finally here, and I'm telling myself that I can stop being Grinch-y about Christmas decorations and the like.  I love the awe and wonder of Christmas ... for about 2 weeks.  Yes, do a little shopping and planning, but my tree is not going up for another week!

Until then, life as normal.  Which often means dinner for one. I like to have proper meals, even when I'm alone. I don't really mind cooking for myself, I think it has helped me develop as a cook, to learn more about tasting and adjusting flavors. But there are limits on just how much time I'm willing to spend cooking for just me, especially the cleaning up part.  There are a disconcerting number of these meals that I cook in a 10" or 11" non-stick skillet:
  • Scramble (leftover potatoes, onions, something green, meat or bacon and/or an egg on top)
  • Spiced Chickpea and vegetables (I'll post this one soon)
  • Fried Rice
  • Scrambled eggs with veggies
  • Mini-frittata (well, this uses a 6" non-stick skillet.  Just like this, but just 2-3 eggs)
To make this happen, its very helpful to have leftovers.  Things like boiled potatoes, leftover chicken (or turkey) or sausage, plain rice, or pasta whatever.  The leftovers, combined with some fresh vegetables, allow me to make something completely different from night to night that's healthy and filling and tasty. When I don't have leftovers, beans or eggs or a sausage from the freezer often find their way into dinner for one.

I can tell you that I don't really have recipes for these skillet dinners  I'm going to show you what I do, and write something that looks like a recipe, but don't worry about following too closely. And I'm not worried that my tree is not up yet.

Fried Rice

Get everything out:  leftover rice (enough for one person), leftover meat (optional.. sometimes I'll use cashews or almonds if I don't have meat), aromatics like garlic, ginger, hot peppers (or can use red pepper flakes.. or not if you don't want spicy), onions, and an assortment of veggies so that you have a couple of cups or so when they are chopped.  I have zucchini, carrot, red pepper, and some leftover green beans for this batch.  Other things I like include mushrooms, broccoli, cabbage, kale, asparagus... pretty much what ever needs to be used up.  Plus an egg, some oil, and some soy sauce.


Start chopping.  Finely mince the aromatics, chop everything else. 


Get out a 10 or 11 inch non-stick pan, and heat some oil (a tablespoon or so, enough to coat the bottom) over medium high heat.  Add the aromatics, veggies, and rice.  Also throw in nuts if you are using. Let cook.  Stir occasionally.  You want things to brown a little. 


When the veggies are almost done, stir in the meat.  Then push everything to the side, and put a little more oil in the middle (by the way, I think I actually used chicken fat (schmaltz) here because I happened to have some left from roasting a chicken, but anything works).  


Drop the egg on the oil. 


Then quickly stir to scramble and cook.


When the egg is mostly cooked, mix everything together, and drizzle with soy sauce (I'm guessing a teaspoon or two).  Taste, you can always add more soy sauce if needed.


If you want to make this for 2, use a 12" skillet.  Although I'm guessing that this might make 2 servings for some people (those who don't swim for example).  

Fried Rice

Makes one big serving.

Oil or fat of choice (vegetable, olive, chicken fat, etc.)
1 clove garlic, minced
½ teaspoon ginger, minced
1 hot pepper, minced or ¼ teaspoon red pepper flakes (to taste)
½ small onion, chopped
2 cups (or so) of assorted chopped vegetables, such as green beans, broccoli, asparagus, carrots, celery, mushrooms, bell peppers, summer squash, etc.
1 cup (or so) of cooked rice (brown or white)
1 egg
1-2 teaspoons soy sauce (to taste)


Heat oil in 10 or 11 inch non-stick skillet over medium high heat. Add the aromatics, veggies, and rice.  Also throw in nuts if you are using. Let cook.  Stir occasionally -- things should brown a little.  If things are sticking, turn down the heat and add a little water. When the veggies are almost done, stir in the meat.  Then push everything to the side making a well in the middle. Put a little more oil in the middle then put the egg on the oil. Then quickly stir the egg to scramble and cook. When the egg is mostly cooked, mix everything together, and drizzle with a teaspoon of soy sauce. Taste, add more soy sauce if needed.


Saturday, November 22, 2014

Juicing

I am blessed in that I can eat pretty much anything, and thrive on a diet that includes a lot of vegetables, both raw and cooked.  But not everyone has the time, desire, or digestive track to consume copious amounts of vegetables. I think that juicing is a good way get nutrition from raw vegetables (and fruit too) if you need easy to digest calories because of health issues or endurance exercise and you don't want empty calories.  Unfortunately, juicing has more hype surrounding it that most food preparation methods, with health claims that are more false than true. Finding recipes for juices are a challenge, you need to wade through all sorts of weight loss advertising and "cleanses" which don't have any scientific basis.   And what you find are hundreds of seemingly random combinations of fruits and vegetables with vague quantities and no yields.  Which all just brings out the engineer in me.  I had the chance to do some experimenting with my mom's juicer, and here is what I learned.

Yields...  Most vegetables yield about 50% juice... If you start with a pound (16 ounces) you end up with 8 ounces. Celery is particularly juicy, you get about 75% juice, cucumbers and bell peppers will also will yield more than average.  Fruit, like apples and oranges, yields around 75% juice.   So if you want 10 ounces of finished juice, you should start with about 7 - 8 ounces of fruit or juicy vegetables, and 10 ounces of veggies (just over a pound total).

Flavors... In general, juicing concentrates flavors.  If you don't like the vegetable, you won't like the juice, so don't think that juicing is a good way to get lots of the vegetables you don't like.   Fruit and juicy vegetables are more neutral in flavor (but still there).  Ginger is especially strong, a piece the size of the end of your little finger will go a long way. Vegetables with bitter flavors (spinach, broccoli) will have juice with bitter undertones, and if you are not a fan of bitter, don't use too much of these, there is only so much you can cover up with sweeter or stronger flavors.  My mom even found she could taste the bitterness of carrot peels in the juice, and prefers to peel the carrots first.

Color...  You can get some beautiful red or green juices.  For red, beets, pomegranate pips, red bell peppers, and carrot all give a nice color.  For green, greens (spinach, herbs, broccoli, etc) will add vibrant green to a neutral base.   However, a mix of red and green can result in a fairly  mucky (i.e. swamp water) looking juice, which might taste fine, but you have to get it past your eyes first.

Juices are best when they are first made.  The same reaction that causes cut fruit (like apples) or vegetables to turn brown happens with the juice.  The mint that I juiced had a noticeable brown layer on top after sitting on the counter for an hour or so.   That said, the juices will still be tastely after being in the fridge (sealed in a glass container) up to a day but not longer.  There is a lot written about how the enzymes and other nutrients will drop over time, but it's not clear there is any science behind this (other that the drop that occurs for all vegetables starting when they are harvested).

So here is my advice.  Don't worry about a recipe, because even if you find ones that look interesting, you likely don't have everything on hand  (they are useful to give you thoughts about what else to juice, but leave it at that).    I liked a blend of juicy things (orange, apple, celery or cucumbers)  as a base plus some greens and root vegetables to get a nice color, more flavor and body plus a flavor pop from something like ginger, lime, and/or lemon.  Herbs like mint also give a nice pop, and sometimes a little salt is needed.  Like anything, you need to have a balance between the sweet / sour (acid - like lemon juice) / bitter / spice that can only come from tasting then adjusting.  Salt will balance bitter and grassy flavors, acid will brighten the taste.  Also, mix it up as you are putting stuff through the juicer, end with a good bit of the base, as some of this will stay in the juicer (for example, if you put the ginger in last, you would not get much of it out).  

One thing that everyone needs to tailor is sweetness.  You can do all fruit juice blends and they will be tasty.  But this is a big pop of sugar without the fiber of fruit, which I don't think is the best thing for you other than as a treat, like dessert.  The trick is to put in enough fruit to provide sweetness so its drinkable. Here is another bloggers input on juicing, which comes to the same conclusion.  I liked juices that had a good base of celery or cucumber, some sweeter vegetables like carrot or beet, plus a good hit of lemon or lime and ginger, but most people like to have a bit more sweet from fruit.  And when looking at the juice that you can buy at juice bars, they almost always have a good fruity base (so think of these as a treat, not a wholesome meal).

I'm not ready to go out an get a juicer of my own, but really glad I got to try one out.  Next I'll have to experiment with a Vitamix and smoothies.  Any volunteers with a Vitamix?


Friday, October 24, 2014

Ken's Chicken Dinner

Winner winner
Chicken dinner
Winner winner
Simple dinner

My father-in-law is teaching himself to cook. The other day he asked if he could cook chicken, potatoes, and carrots together in the oven. Maybe other vegetables.  I was thinking of course, but things would cook at different rates. Maybe you would need to stagger how you put things in the oven.  But this inspired me to try it out and to keep it simple (I have heard commentary for some people who will be left un-named ...mom... that claim I do everything the hard way).  One of my pet peeves are recipes that are called "simple one-pot meals" that really need 2 saucepans, a baking dish, the food processor, a colander, and a bowl or two.  And don't include a vegetable.  This dish really is a whole meal and really needs just one pan, and one cutting board (although I'm sure my mom would do this using a paring knife against her thumb).  The only caveat is that if you want to make enough for 4 or more people, it will take a really large pan.  Or 2 pans.

It came out good.  My only recommendation was to use bone-in chicken instead of boneless chicken to not over-cook the chicken while giving the potatoes time to get nice and soft.  I used chicken thighs ... to me they have a lot more flavor and are more suited to slower cooking. Legs would be good too.  Feel free to adjust the vegetable quantities and types to your taste or what you happen to have on hand. I really didn't measure anything when I made this, you don't need to either.  Sweet potatoes instead of white ones, winter squash instead of summer, more onions would work. Skip the mushrooms if you don't have any.  Maybe use cabbage. You  could certainly use fresh herbs if they were handy.  I'm sure I will do some more experimenting on this through the winter.   Maybe I will be the one that really learns something!


Ken's Chicken
Serves 2-3

2 - 3 medium potatoes, cubed
3 small zucchini, cut in large chunks
4 medium carrots, cut in large chunks
1 cup or so of mushrooms
1 very small onion (or more.  or not)
3 cloves of garlic, minced
1/2 teaspoon italian seasoning or dry oregano
1/2 teaspoon of salt
1/2 teaspoon of pepper
2 tablespoons olive oil
4 chicken thighs and/or legs (preferably with skin and bones)

Preheat the oven to 375F (use convection if you have it).   As you cut up the vegetables, toss them into an oiled 9 x 13 pan.  Sprinkle with garlic, herbs, salt, and pepper, then add the olive oil (not too much - you will get more fat from the chicken) and give a good toss (hands work best for this).  Sprinkle the chicken with salt and pepper (and if you are using boneless skinless pieces against my advice, put some oil on them too), and nestle in among the veggies.   Bake for 30 minutes, then stir the veggies around, bake for another 20 minutes (with convection) to 30 minutes or until everything is done.


Sunday, August 17, 2014

Abundance

In all the talk about eating seasonally, I think we miss the abundance that can come when a crop is ready to harvest, or an animal ready to slaughter.  In our modern world of supermarkets and even farmers markets you can get pretty much whatever is in season (and a lot that isn't), in what ever quantity, all for $3/lb or $30/lb or whatever price the market will bear.

But you never buy 15 pounds of lemons....

Or a hundred plus pounds of fish (only 40 or 50 of these belonged to my dad and brother).


Or even 5 pounds of figs....

(sorry, no picture)


This kind of abundance spurs creativity to figure out how to eat it everyday, how to preserve it, how to share it.  It lowers the risk of trying something new.  This abundance is something that we usually miss if we don't grow it or pick it or kill it ourselves (or have friends, family or neighbors that share generously).

I have a friend with a fig tree, and a few weeks ago I helped pick some of the figs.  They are the green figs (I'm not sure which variety), not the purple mission figs (which I don't really like).  I ate some fresh, some in yogurt.  I made jam.  We grilled some after a big fish dinner (another case of abundance) and served on ice cream with chocolate sauce.  To grill the figs, I just cut them in half (didn't even peel), and put on the grill for 5 minutes or so.


And I  made a Clafouti.  It's a French dessert, pronounced "klah/foo/tee". It's kind of a cross between a flan and a cake, with a lot of fruit it.  I like them because they are unusual, not too sweet, and not too much trouble to make.  They are traditionally done with cherries, but you can use most any fruit... that you have in abundance!


Fig Clafouti
Serves 6

1 lb small fresh figs, peeled and halved
¼ cup orange liqueur (like Cointreau)
1 lemon

2 large eggs
¼ cup sugar
¾ cup milk
½ cup flour
Pinch salt
1 tablespoon sliced or slivered almonds

Combine the figs and liqueur in a medium bowl.  Add grated zest from the lemon, plus about 2 teaspoons of the juice to the figs.  Stir and let sit for an hour or so.

Preheat oven to 350F (or 340F convection bake).  Coat an 8-inch deep dish pie pan (or something similar, like a cast iron pan) with butter or cooking spray.  Pick the figs out of the bowl (leaving the syrup) and place into prepared pan.  Put the syrup in a smaller bowl (use a rubber spatula to mostly clean the bowl).

Combine the eggs and sugar in the same bowl.  Beat with an electric mixer on medium-high speed until pale yellow, this will take several minutes.  Add milk, flour, salt, and reserved syrup, beat to blend.  Pour the batter over the figs, sprinkle with almonds.

Bake until puffed and golden, 45 to 55 minutes (or 40 minutes on convection bake).  Let cool about 20 minutes to serve warm.  Also good at room temperature, refrigerate the leftovers for breakfast.  


Monday, August 4, 2014

A day at the beach


Some days are better than others. Last Friday was one of better.  Perfect weather, nice waves. Not too much kelp.   

Boogie boards... an amazing amount of fun for something that's pretty easy to do in the right waves. 

Surfing... something that looks easy but takes skill.  It helps when you start when your 5 and not 50. That didn't stop me from trying though.  I'm very proud that I actually got up, on my own.  Like I said, the waves were good (as in good and not too big). 

Especially nice was having family around.  It's rare to get all the family together at once, and this was no exception. For dinner my dad and brother and niece were there, my husband was home, and his folks came over.. not everyone, but a nice gathering none the less.  The plan was to highlight the fish caught on the 5-day fishing trip my dad and brother just returned from.  We had yellowtail and yellow-fin tuna.  The plan for the tuna was to just season with salt and pepper, and cook on high heat for just a minute or two per side, which resulted in a nice rare interior. The fillets were sliced for a pretty presentation.  Really good, really simple.  


The yellowtail was grilled on foil, similar to the way I do salmon.  It's simple too, but the salmon recipe seems more complicated, as it includes a sauce and seems limited to salmon.  I wanted to include the more generic version because its the way I cook fish at least 80% of the time.  We had 3 chefs tending the grill, resulting in perfectly cooked fish. The dinner was rounded out with brown rice, a green bean salad (I''ll get the recipe for the lemon-mustard dressing posted as soon as I make it again and measure amounts), and a peach salsa (something like this, but with peaches instead of mangos).  For dessert, we had grilled figs on vanilla gelato.  A good day overall. 


Fish Grilled on Foil

This is my go-to method for cooking any meaty fish, like yellowtail, halibut, salmon, as well as some of the local sea bass and baqueta grouper we get. 

Fish fillets (best if about ¾ - 1 inch thick)
Olive oil
Lemon or lime juice
Salt, Pepper
Green herb like garlic chives, dill, or parsley

Preheat a gas grill to medium (350-400F).  Make a foil pan:  get a piece of foil that’s a bit over 2x the size of the fillets side by side.  Fold the foil in half (I always do shiny side out, but not sure it matters).  Lay the fillets on the foil, skin side down if they have skin, with maybe a ½ inch between them. If there are thin tail sections, fold the thin part under to get a more even thickness.  Fold up the sides of the foil to make a ½ inch lip around the fish.  Put a thin coating of oil on top of the fish pieces, and if they are skinless, put a little oil under the fillets too.  Squeeze a little lemon or lime juice on top, then sprinkle with salt and pepper.  Top with a nice sprinkle of herbs.  Place the foil on the grill, over the burners.  Cook until just done.  I plan for about 10 minutes per inch of thickness, but start testing sooner.


Saturday, July 19, 2014

Butterflied Grilled Chicken

I have always considered myself to have good mechanical skills.  I learned to take apart and grease a sewing machine when I was a kid.  I can read schematics, put together Ikea furniture.  I spent a couple years of my engineering career working on precision molds and die-sets.  But when it comes to working on things that really get your hands dirty, like cars or bikes, I have virtually no experience. There was always a brother, or husband, or mechanic who did these things. I never doubted I could do them, but self confidence only goes so far.  I recently bought a bike off of Craigslist.  I spent $45. It pretty much worked, except the front wheel didn't spin freely.  I did a little googling and determined the front hub needed to be repacked.  Then some more googling for video's on how to repack the front hub, which all looked doable.  My biggest fear is that the bolt to get the wheel off would be rusted on, but it came right off. More YouTube video's searched to figure out out to release the brake to get the wheel off.  Everything came apart as described, the bearings were in good shape, a little bit of cussing to get the ball bearings back, a short phone consult with my husband about grease, it went back together and it works!  The moral of this story is that You Tube is an amazing learning tool.  You can learn things that maybe you are too embarrassed to admit you don't know or don't have anyone around to show you.  And I'm telling you this story because there are lots of cooking techniques you can learn from YouTube.  Like how to butterfly a chicken.  

This recipe is a riff on "chicken under a brick" recipe, I have just skipped the brick.  It still comes out great. And I have included the instructions to put orange slices under the breast, but half the time I forget to do it, and the chicken still comes out good.   And most the time, I don't have all three citrus types around, so I will just use two kinds (although one is *always* lemon).


Grilled Citrus Chicken

1 large orange
Juice from 1 lemon
Juice from 1 lime  
2 tablespoons olive oil
1 garlic clove, chopped
1 tablespoon finely chopped fresh oregano
2 teaspoons finely chopped fresh rosemary
1 teaspoon paprika or ½ teaspoon mild chili powder
1 teaspoon black pepper
1 teaspoon salt

1 whole chicken, preferably 4 pounds, but this works for a typical 5 or 5 ½ lb bird.

Cut 6 thin slices from the orange.  Put into the refrigerator for later.  Make the marinade:  Juice the rest of the orange into a small bowl.  Add the other juices, oil, garlic, herbs and spices and stir. 

Butterfly the chicken:  With the breast side down, grab the chicken tail (aka the Pope’s Nose).  With scissors, cut up the side of the backbone.  It’s easy until you get to the shoulder bone, find the joint to get through.  Repeat on the other side of the backbone.    Now, cut out the breast bone. This is trickier, and not absolutely necessary.  Use a small knife to cut the cartilage at the top of breast bone, then use your fingers to pull out (check out the video to see how this is done).  If you are so inclined, put the backbone, neck, and giblets into a freezer bag and save to make broth at some later date. Remove the big chucks of fat (and if you are a real fanatic, you can render these down to make schmaltz). 

Put the chicken in a gallon zip-loc bag, add the marinade and distribute to cover all around.  Let chill for 2 – 5 hours. 

Start your grill; get to about medium (350 - 400F). Pull the chicken out of the bag, Carefully loosen the skin on the breast and insert an orange slice or two between the breast and skin.  Do the same on the thighs.  When the grill is hot, oil the grill racks (I like to put oil on a paper towel, then using tongs, rub the oily towel on the grill), then put on the chicken on the grill skin side down.  Turn the burners down to low (goal to maintain about a 350F or so, and not catch the bird on fire).  Cook for 15 or 20 minutes, until the skin is nice and brown.  Using a spatula and tongs, carefully flip over.  Cook for another 20 to 35 minutes until done (this is about 155 – 160F in the thickest parts of the bird). Let rest for 10 minutes or so, then carve and eat.


Wednesday, June 25, 2014

Bacon, Corn, and Chili Soup

I am not big on planning my meals ahead.  I go to the farmers market and buy what looks good, and generally figure out day by day what I'm going to cook.  I've written about this before, but one of the tricks to making this work is knowing good substitutions.  This week I had corn from the farmers market we had not managed to eat.  Soup sounded good (apologies to my friends in Phoenix, but "summer soup" is not an oxymoron in Coronado). I almost always have bacon in the freezer (you can just cut pieces off the frozen chunk, start cooking it slowly to thaw), and an onion,  But I did not have any milk or jalapeno peppers to make the corn soup I wanted. I did have coconut milk, and chipotle chili flakes. So I thinned the coconut milk with water (its very rich, more so than even half and half), used the chili flakes, and it came out very nice. 

There is a level of confidence and experience needed to pull off substitutions.  Google is also a good help for some things.  I find that onions, shallots, and leeks are pretty interchangeable, buttermilk can be faked with yogurt or milk with lemon juice or vinegar added.  Red peppers can substitute for tomatoes (for some dishes, its best to roast the peppers first).  I try to think through -- what will the texture / moisture or fat level / heat level / sweetness / color be like?  How different will the flavor be, and will the different flavor be different good or different in a bad way? Then just taste as you go along.  And remember that salt, acid (like lemon juice) and hot sauce can fix a lot of things that aren't quite right.

And now I have half a can of coconut milk to use up.  I have rum, but not any pineapple juice...

Bacon, Corn, and Chili Soup 

Serves 2 as main or 4 as appetizer

1 teaspoon olive oil
4 slices (about 4 oz) bacon, cut in ½ inch pieces
1 onion, chopped
1 clove garlic, minced
2 jalapeno chilies, minced or ¼ - ½ teaspoon chipotle chili flakes
Salt – about a ½ teaspoon or so to start
4 ears of corn, cut from the cob (or 4 cups of thawed, frozen corn)
1 cup of water
1 cup coconut milk
Black pepper, 3 or 4 good grinds
Hot sauce
Avocado or sour cream or yogurt to garnish, maybe a squeeze of lime
Chives or cilantro to garnish

In medium pot, cook the bacon in olive oil until crisp.  Remove bacon (but not the grease) from pan.  Add onions, garlic, and chilies to pan along with some salt.  Sauté until soft, 5 to 10 minutes.   Add corn from 3 of the ears along with the water, and cook for 5 minutes at a gentle boil.   Remove from heat, add milk, and blend with an immersion blender (or food processor if you like to do dishes).   Just blend a bit, still want some texture.

Add remaining corn and pepper.  Taste… add more salt and/or hot sauce as needed.  Heat back up to steaming (don’t boil) and serve with garnishes and reserved bacon.

Sunday, June 15, 2014

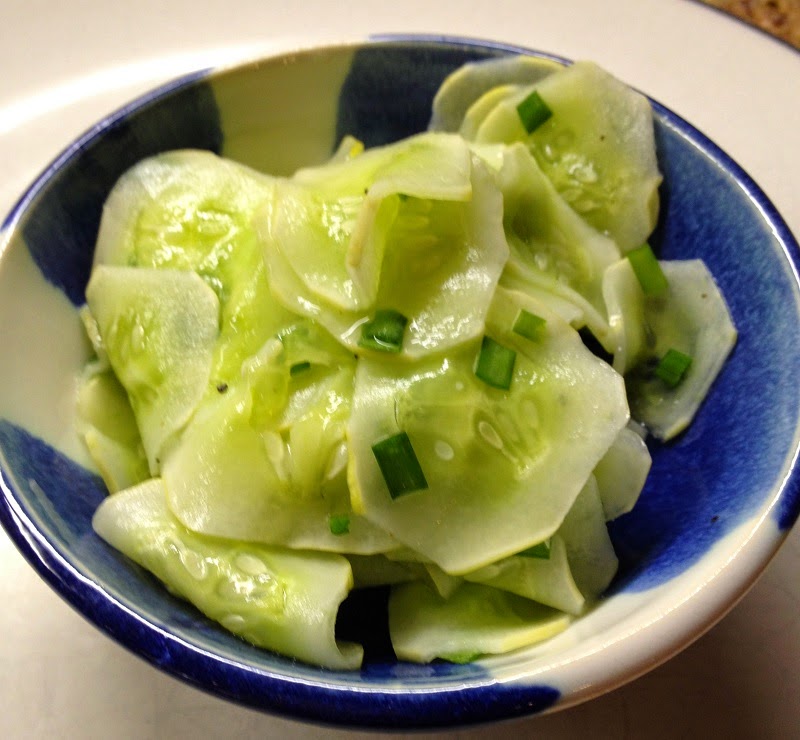
Cucumber Salad


Summer is here, and my last post was around New Year's.  I have a bunch of really good excuses for having gone 6 months without a blog post.  The best excuse is moving my home from Phoenix to Coronado.  The second best excuse is moving my blog from GoDaddy to Blogger.  Both have been a pain in the you know what.  And both have been a bit of a trip down memory lane.  I was in the Phoenix house for 13 years, and have been doing the blog for 7 years.

For both moves, I had to decide what to take, and what to not.  Some things are good to let go, some things need to go, just make space, and make life easier.  One thing that I am losing on the blog move are the comments.  I do have them all backed up, but don't know how to put them back into the blog.  But all of the recipe posts (along with travel and pottery related posts) are still here, and you can still link to them from the firecooked.com food page.  At least I think that everything is linked... let me know if there is a broken link!  Also... If you want to get emails when I do a new post (hopefully won't be another 6 months!), you need to re-signup. 

We are getting good cucumbers at the farmers market now.  Here is an easy salad that goes great with a summer dinner.  

Cucumber Salad

Makes 6 to 8 servings

1/3 cup distilled white vinegar
2 tablespoons water
2 tablespoons sugar
3 teaspoons finely chopped fresh dill (or 1 teaspoon dry)
   note... I have been using garlic chives, since that's what I have in the garden.  
2 teaspoons salt
1/4 teaspoon ground white pepper  (or black, just not as pretty)
3 medium cucumbers, peeled and very thinly sliced

Whisk vinegar, water, sugar, dill, salt, and pepper in medium bowl until sugar is dissolved.  Add cucumbers; toss to coat.   Refrigerate, covered, tossing occasionally, at least 4 hours (or 1 or 2 hours if you plan like me) before serving.


Wednesday, January 1, 2014

Happy New Year!!!


I love the holidays, and the special foods that I only eat once a year (sugar cookies!!) but I’m ready to get back to normal eating. I thought I would share a recipe that I think of as a holiday recipe, but really it’s a good winter recipe, especially for those of us that live where warm beach days are a possible in the winter.   The directions below give a really nice presentation, but don't let that stop you from roasting some extra squash and throwing this together for lunch.  I also suspect that dried cranberries or cherries would be a good stand-in for the pomegranate seeds.


Winter Squash Salad

½ cup pecan halves
1 medium butternut squash
Olive oil
1 teaspoon fresh thyme (optional)
½ cup pomegranate arils
1 teaspoon Dijon mustard
1/3 cup sherry vinegar
2/3 cup olive oil
Salt, Pepper
Baby arugula (3 – 5 ounces)

Heat oven to 425F (use convention roast if you have it).

Toast the pecans (ok if oven is not to temperature) on a pan lined with foil. They will cook quick: 3 to 5 minutes if oven is hot. Watch closely! Let cool then wrap in the foil.

Peel and cube the butternut squash. Microwaving the whole squash for a couple of minutes will make this easier. Place a piece of parchment paper on a sheet pan, put the squash on the paper. Drizzle with a couple of tablespoons of olive oil, and sprinkle with a bit of salt and toss with your hands. Roast until cubes are soft with some brown spots. This should take 15 to 30 minutes, depending on the size of the cubes and whether you are using convection or not. Sprinkle with thyme when they come out of the oven. Let cool.

If you have a whole pomegranate, here’s a trick to seed

Make the sherry vinaigrette: put mustard, sherry, about a ¼ teaspoon salt and a good grind of pepper in a container. Using an immersion blender (or whisk), slowly add the olive oil. You won’t need all of this.

If doing ahead, put everything into baggies and/or containers and refrigerate. Will hold for a couple of days. Let everything come to room temperature when you are ready to make the salad.

Assembly: put a base of arugula on a platter, dress with a bit of vinaigrette (easiest to use your hands for this). Dress the squash with more vinaigrette (easiest if squash is in a baggie, just add ~ ¼ cup and work it around)… taste to get the right amount. Put the squash over the arugula. Top with the pomegranate seeds and pecans.