Vegetables Every Day

Vegetables Every Day
Carrot Tarator with Beets
Showing posts with label Soup. Show all posts

Wednesday, March 22, 2023

Lentil Stew


The last post I did was for a bean stew... since then there have been 12 atmospheric rivers dumping a record amount of rain in California.  So I am still making bean stews!  This is an update of a winter squash and bean stew that I do with lentils.  Lentils have all the wonderful protein packed benefits of beans, but they cook much faster: 20 - 30 minutes.  Plus they grow with much less irrigation than other crops like wheat and corn. I'm sure we will sometime soon find that important again. And while I love winter squash in stews, they are gone from the markets, but this works well with pretty much any vegetables you have around.  I added mushrooms and cabbage to this soup along with extra carrots. Plus as always a bunch of greens - in this case I used collard greens which I love in soups.  

 
Rosemary and Bay from the front yard

Don't hesitate to add plenty of red pepper, or some hot sauce at the end. Yesterday's batch was a bit under seasoned - I added a nice spoonful of salsa which gave it a nice kick.  

Here's what went into yesterday's batch: 


Chop and saute: 


Cook .. Just 30 minutes!

Add greens (chop first): 


And its done!


 The recipe: 

Vegetable and Lentil Stew with Sausage

This can be a clean the crisper drawer kind of soup, with any kind a vegetable


1-2 tablespoons olive oil 

1-2 slices of bacon (optional, good if you don’t use sausage)

2-3 links of pre-cooked chicken sausage (or use pork sausage – sauté instead of bacon)

1 large onion, chopped

1 to 4 carrots, sliced 

1 or 2 celery stalks, sliced (optional)

2 cloves of garlic

Red pepper flakes to taste

Rosemary (1-2 teaspoons fresh), bay leaves (2-3), and/or Italian Seasoning

More veggies as desired: mushrooms, cubed butternut squash or sweet potato, green beans, tomatoes

6 cups of liquid - 1 quart chicken broth plus 2 cups water (or all water or all broth)

1 pound of green lentils, rinsed 


1 bunch of greens (kale, mustard, chard), stalks removed, chopped (or baby spinach)


Herbs, lemon juice, salt, pepper, hot sauce to taste.


In a large pot, heat the oil.  Sauté the bacon if using.  Add onion, sausage, celery, garlic, chili (plus any veggies that would benefit from sautéing like mushrooms), plus salt to taste (I start with a ½ teaspoon).  When onions are translucent (5 minutes or so), add carrots and other vegetables, rinsed lentils, broth / water and bring to a simmer.  Cook for 25 or 30 minutes, until lentils are tender (don’t cook to the point of falling apart).  Add more water if desired. Add chopped greens.  Kale or mustard greens need to cook 5 to 10 minutes; baby spinach is done as soon as you have stirred it in. Taste – add salt, maybe a squirt of lemon juice, herbs, some pepper, maybe some hot sauce as desired. 

Friday, October 30, 2020

Pressure Cooker: Black Bean and Chorizo Soup


It seems like fall is here all of the sudden.  Nights are cool, complaints coming from east coast relatives about it being cold and it's almost Halloween! The latest meal I have been making regularly is a Black Bean and Chorizo soup.  I might even be making it more often than Curried Lentils.  I make in it in a Breville Pressure cooker, which is similar to an Instapot.  From recipes I see on the web, I am guessing the Breville cooks at a slightly higher pressure, as most things will cook faster than called for in a Instapot.  In my opinion, this is the biggest challenges to using a pressure cooker is figuring out the cook time.  Soaked beans will cook much faster (5-6 minutes for soaked black beans vs 22 minutes for unsoaked), fresh beans cook faster than old beans, and different pressure for different cookers.  But you can always just cook some more if you need (and use the quick release, as the natural release is what takes the most time in this recipe). Also ... this is just a version of my Vegetable Bean and Sausage Stew, which is cooked on the stove... On the stove, I would recommend soaking the beans first, and it probably would cook in about the same total time (my guess is the soaked beans would need to cook for an hour or a bit more on the stove at a gentle simmer).  


I like a lot of greens in my soups... this is just one bunch from the Marcella's Farm stall at the Coronado Farmers Market.  You could use a lot less if you want.


When I made this batch, I found I only had a 1/2 pound of black beans in the panty, so I mixed in a 1/2 pound of pinto beans.  The soup is normally darker brown. 


Black Bean and Chorizo Soup

Makes 5-6 servings

1-2 tablespoons olive oil
6 ounces Mexican chorizo sausage
1 large onion, chopped
1 or 2 carrots, sliced
1 or 2 celery stalks, sliced (if you have them around)
2 cloves of garlic
1 jalapeno chili, or some chili flakes
1 pound black beans, rinsed   (pinto beans also work)
6 cups water
Salt (about ½ - 1 teaspoon) and  freshly ground pepper
 
1 bunch of greens (kale, mustard, chard), stalks removed, chopped (or baby spinach)

Garnish:  Sour cream or Greek yogurt, cilantro, avocado, chili slices, fresh corn, grated or crumbled cheese

 In the pressure cooker, heat the oil (using Sear setting).  Slice the chorizo if it is in a casing, or make little balls if not, and cook in the hot oil until brown.  Add onion, carrots, celery, garlic, chili.  When onions are translucent (5 minutes or so), add beans, water, salt and pepper.   Pressure cook using the “bean” function (high pressure) for 22 minutes (note – may be longer with an Instapot).  Let pressure reduce naturally.  When done, taste the beans and make sure they are cooked (if not, cook under pressure for a few more minutes, and OK to manually release the pressure).  Also taste for salt and add more if needed. Turn cooker to slow cook, high setting.  Add chopped greens.  Kale or mustard greens need to cook about 5 minutes; baby spinach is done as soon as you have stirred it in.   

 Serve with a garnish or two. Freezes well.

Saturday, December 21, 2019

Pressure Cooker Beef Stew

Merry Christmas!  Hope everyone has a wonderful holiday.   Also ... for those of you with my cookbook ... I am in the process of doing an update which includes my pressure cooker recipes (some that I have posted here, some that I haven't).  Drop me a line if you want one!


One of the things the pressure cooker excels at is cooking chuck roast... everytime I have cooked various recipes, the meat always comes out flavorful and tender.  I am not going to promote this recipe as "easy" ... even though I have simplified it from the "weeknight stew" recipe I used for inspiration, or quick ... even though it probably does cut an hour off the time it would take to cook on the stove.  But this does make a really, really good stew.  Serve to company good stew.

I took inspiration for this recipe from Serious Eats Pressure Cooker American Beef Stew, but short-cutted a couple of steps.   It could possibly be even better if you did the extra steps, but I'm happy with how this comes out. A couple of the key items I did keep in is adding gelatin to the store bought broth (if you had some great homemade chicken broth, you could skip this), as well as adding some high umami ingredients, like soy sauce, fish or Worcestershire sauce (the recipe calls for both, but I don't keep Worcestershire sauce in my pantry).   I also shortened the cooking time... I have found that a lot of the Serious Eats pressure cooker times are just way too long for the Breville pressure cooker.  I think the Breville's cook at a bit higher pressure, so if you are using a Instant Pot, look at the manual on their recommended cooking times.  And let me know how it works and I will update the recipe for both types of cookers!


On the beef:  you really want to use chuck roast (or chuck steaks).  Don't buy stew meat, this is often a mix of miscellaneous small bits of meat, that doesn't have the fat and tough connective tissue that nicely breaks down into tender meat under pressure. One of the twists on this recipe is doing the browning of the meat while in steak form, as it keeps from drying out the meat while still getting the nice brown flavor.

And one last note:  if you like to just have stew for 2, make a batch of the meat but instead of adding the potatoes and carrots, cool down the pot, then split the meat and gravy into 3 1 quart containers (or freezer zip lock bags).   Refrigerate (to store for a couple of days) or freeze each of these.  When you are ready for stew, put the mixture (thaw first if frozen) into a medium pot.  Add a couple of chopped potatoes and carrots, cook on the stovetop until the potatoes and carrots are done (about 45 minutes).  That is a quick and easy meal!


Beef Stew

Serves 5-6… I usually figure about 1/2 pound of meat per person.  

2 - 3 lb beef chuck roast
Salt and pepper
2 tablespoons oil or fat (like olive oil)
Generous ¼ cup flour

3 cups low-sodium chicken broth
4 packets powdered unflavored gelatin (1 ounce)
1 tablespoon soy sauce
1 tablespoon fish sauce or Worcestershire sauce
2 tablespoons tomato paste (optional)
1 teaspoon dry or fresh thyme or other herb (rosemary, oregano, Italian herbs)

8 ounces mushrooms (brown cremini or white button), quartered
1 large onion, chopped
2 - 3 ribs celery, sliced 
2 - 3 cloves garlic, minced
1 cup wine (white or red, or use more broth)

6 carrots, peeled and sliced
4 - 6 potatoes, cubed (peel if desired)
More fresh herbs (parsley, etc.)

Cut meat into steak-like pieces, each 1 to 1 ½ inches thick.  Salt the meat.  Heat the oil in pressure cooker using sear function.  Brown each side of the meat (do in single layer batches), and place on large plate to cool.   Meanwhile, mix the broth, gelatin, sauces and thyme in a large measuring cup.  If you would like, heat a bit in the microwave to get to pressure quicker. Set aside.  

Put mushrooms, onions, celery, and garlic into the hot cooker.  Add salt and pepper.  Let cook until onions are translucent.   Add wine; scrape any bits from the bottom.  Let the wine cook down by half.   

Cut the meat into 1 – 1 ½ inch cubes, removing any large chunks of fat.  Toss with flour.  Add the meat to the pot then then add the broth mixture.  Pressure cook using the “chili and stew” setting for 20 minutes (10.5psi, quick pressure release).   When complete, add carrots and potatoes then use “vegetable” setting for 8 minutes (7.5psi, pulse pressure release).  Serve with additional fresh herbs.


Saturday, December 29, 2018

New Toy: Breville Pressure Cooker


Did you get a pressure cooker for Christmas?   I got one last year, and still have mixed feelings.   It is a pain to get out, set-up, and clean, but it does a few things very well:

1. Make broth.   You get broths that are full of gelatin in about 2 hours.
2. Braise meats, especially chuck roast for barbacoa or stew.  Also handy to cook up chicken legs.
3. Hard cook eggs, because they peel easy.   Every time.
4. Cook beans... just be aware there is a lot of variation in cooking time.
5. Cook grains, although I haven't played with this much. 

The biggest misconception about the pressure cookers is that they will get dinner on the table quickly.  Just because the cooking time for beans might be 10 minutes, that doesn't mean dinner will be on the table in a half hour.   To cook a pot (1 lb) of beans, it takes a 25 minutes or so to get up to pressure, 20 minutes to cook, then at least another 45 plus minutes to depressurize... all of the sudden, you are looking at an hour and a half, which is about how long it takes to cook beans on the stove.  The advantage is that its totally hands off cooking, no waiting for it to come to a boil, turning down to simmer and on my stove, getting frustrated because you can't maintain a slow simmer.  And sometimes you can depressurize more quickly, although this is not recommended for beans, or anything that might have a layer of fat on top (like braised meat).

One other thing I'm still working on is the cooking time.  Most recipes have cooking times that are just too long.    I have a Breville Fast-Slow Pro, not an Instapot like everyone else, I am guessing that it runs a bit higher pressure.  The good thing is the preset times are generally pretty good and help make a good guess to start, but beans are still a challenge.   The best reference I have found so far to cook beans is this page from Rancho Gordo...  it really gives you a feel on how different the times are for soaked vs. unsoaked, and for different varieties of beans.

I made this a couple of nights ago... and was really happy with the result.  Soaking the beans allows the beans to cook in the same time as the squash.  Seemed the perfect dish after all of the holiday meals. 


Winter Squash, Lima Bean and Kielbasa Soup (Firecooked)


This is a take on my beans and greens soup.  It comes out quite well in the pressure cooker, and this combination makes a very pretty soup.  If you don’t have a pressure cooker, it will cook just fine on the stove.


1 pound dry white lima beans

1 tablespoon olive oil 
1 large onion, chopped
2 carrots, sliced
2 cloves of garlic, minced
1 small butternut squash, peeled, seeded, cubed
12 ounces smoked kielbasa, sliced (about ½” slices)
Pinch of red pepper flakes
½ teaspoon salt, or to taste

1 quart chicken broth
2 cups water

1 bunch collard greens, de-stemmed and chopped

Rinse the beans in a colander, then put into a large pot and cover (by a couple of inches) with water.  I use the cooking pot to do the soaking as to not get another bowl dirty.  They should soak at least 6 hours, but not more than 10 or so.  Drain the beans when ready to start the soup. 

In a pressure cooker, heat the oil on the sauté Setting.  Add onion, carrots, garlic.  Add the squash and Kielbasa as you get them chopped.  Add a bit of salt (the sausage is usually quite salty, so you don’t need much more) and the red pepper flakes.   When onions are translucent add the drained beans, broth and water.  Beans should be covered by a ½ inch or so of liquid.   Set to pressure cook using the bean setting (high pressure) for 5 minutes, and natural release (total cooking time on my cooker is about 1 hour 15 minutes).*  Check to make sure the beans are done, and the salt level is ok. Cook longer if needed.  Add the chopped greens.  Put on sauté function to bring back to a boil, turn off and let the greens cook for about 5 minutes.    Serve with a bit of black pepper.


* If you don’t have a pressure cooker, just simmer on the stove.  Guessing it will take about 1 ½ hours.. start checking after the first hour. 


Wednesday, July 19, 2017

Curried Lentils


I'm thinking that Trader Joe's should be sponsoring me. 


This take on beans and greens has quickly become a favorite.  It has a flavor profile that's different from a lot of what I make, and its really quick to put together.  I like curry, but certainly not an expert.  I do know that curry powder is a mix of spices, and that your grandmother from India wouldn't be using some mix out of a jar.  But, so far, I have made this with 3 different kinds (ranging from the above Trader Joe's curry powder to one I bought in London) and they have all been good... although maybe not authentic. I'm guessing a canned curry paste will work too. No matter what kind of curry you use, realize the heat level between brands can vary considerably.  If in doubt, use less, as you can always add some more at the end.  

Besides the curry, what makes this different from my normal lentil soup is coconut milk, it adds a nice richness (and keeps you from noticing there is no meat). And to my friends in Arizona:  even though this is a stew, it's still good to eat on a warm day. 


And like other lentil or bean stews, this freezes very well.  I just put 1 serving into a 1 quart ziploc freezer bag, press out the extra air and seal.  Freeze flat.  When ready to eat, put the bag into a bowl (or sinkful) of hot water.  When thawed (about 5 - 10 minutes), dump into a bowl and heat a couple of minutes in the microwave.  And then garnish.


Freezer Ready


Curried Lentils

6 servings

1 tablespoon oil  
1 large onion, chopped
3 to 4 carrots, sliced 
2 - 3 cloves of garlic, minced
2 - 3 teaspoons minced fresh ginger
1 teaspoon salt
~ 2 tablespoons curry powder (to taste)
1 pound red lentils (or regular green lentils), rinsed
4 cups of water
1 can (13.5 oz) coconut milk
1 bunch of greens (kale, mustard, chard), large stalks removed, chopped, or a bag of baby arugula.

Garnish:  Chopped avocado, yogurt, cilantro, fried egg, and/or lime wedges

Heat the oil in a large pot.  Sauté onion, carrots, garlic, ginger, and salt until onions are translucent.  Add curry powder, stir well, and then add lentils, 4 cups water, and coconut milk.   Cook about 30 minutes, add a bit more water if needed to just cover the lentils.  The red lentils should break down, or green lentils should be soft.  Add chopped greens.  Kale or mustard greens need to cook about 5 minutes; baby arugula is done as soon as you have stirred it in.   Taste -- add salt or more curry, if needed.    

Garnish with chopped avocado, yogurt, cilantro, and/or lime wedges.  To make hardier, add a fried or poached egg, or serve over rice. 


Sunday, October 4, 2015

Chicken Chili... Just in time for Fall


One of my pet peeves is recipes that say they will take 30 minutes to cook but not only would it be impossible for a Top Chef to walk into the kitchen and get it done in 30 minutes, it gets every pot and gadget in the kitchen dirty. This makes you feel like a failure when it ends up taking over an hour to cook (not to mention another 1/2 hour to do the dishes). When you dissect the cooking times from even respected recipe sources, it's clear that the clock does not start when you walk into the kitchen; it starts after the ingredient list is assembled:  the onion is diced, garlic minced and chicken shredded.  Even then, there is sometimes fantasy timing. A couple of weeks ago there was a soup recipe in the Wall Street Journal "Slow Food Fast" column that claimed total time was 50 minutes.  When you added up just the cooking times, it was 56 minutes, not including the time to warm up pans or reheat the soup after after pureeing. You might not expect the WSJ to be experts on cooking, but you would at least think they could do the math.  

So enough of my rant.  How do I get dinner on the the table fast?  And without any many dishes?  One of my secrets is to use the freezer.  I freeze soups, stews, and the like in serving size amounts in 1 quart freezer zip bags.  I lay them flat to freeze, then they will stack pretty efficiently. To get dinner on the table in less than 15 minutes, I put the frozen bag into a large bowl of hot water until thawed (this takes maybe 10 minutes.. and you don't really get the bowl dirty), then empty the bag into a serving bowl and reheat a couple of minutes in the microwave.  Add some garnish (like avocado or sliced green onions) and it even seems special.  

Some things do freeze better than others.  I almost always have Lentil Soup in the freezer. Most vegetable soups are good (like Chicken Noodle or Minestrone), but some vegetables freeze better than others (carrots, winter squash, peppers, green beans, mushrooms, greens, onions are good, but broccoli, zucchini, and potatoes have texture issues).  Another trick is that if I am making something to just go into the freezer (as opposed to just freezing the last couple of servings of Beans and Greens when you realize that another day of eating beans will not improve your social standing) is to quickly cool down the pot of soup by putting it into the sink that is half filled with cold water and some ice.


Chicken Chili

The recipe that I adapted from Fine Cooking magazine called for store-bought rotisserie chicken, which I am sure would work just fine (but maybe not fine cooking when you learn what they inject the chickens with).  I usually start by boiling a cut up raw chicken with onions and carrots, essentially making broth, pulling out the chicken pieces as they get done, pulling the chicken off the bones, then put the bones back into the broth pot and cooking a while longer for broth. You could also start with left-over roasted chicken (maybe do a half recipe), or some left-over turkey.

Makes about 6 servings.

2 tablespoons oil
1 large onion, diced
4 - 5 teaspoons ground cumin
2 teaspoons oregano or Italian herb mix
1-2 jalapeno or other hot chiles, minced (optional, to taste)
3 cloves garlic, minced
4 cups shredded cooked chicken (chicken from ~ 4 pound chicken)
1 4 oz can green chiles
1 quart lower salt chicken broth
2 cans (15.5 oz) white beans, drained and rinsed
2 cups frozen corn
Salt to taste

Garnish (optional):  Shredded sharp cheddar cheese, avocado slices, sliced green onions, cilantro, lime wedges, sour cream or Greek or plain yogurt.

Heat oil in a large pot (5-6 quart).  Add the onion and cook until translucent (don’t brown). Add cumin, herbs, hot chiles, and garlic and cook until fragrant (just a minute or so).  Add the chicken, green chiles, broth, and 1 can of beans.  Bring to a low simmer and cook for about 15 minutes. Meanwhile, mash the second can of beans – place in a small bowl and mash with a potato masher or fork. Add the mashed beans and corn to the chili.  As soon as it's back to a boil, it’s done.    Ladle into bowls and garnish as desired.

Sunday, January 11, 2015

Happy New Year... Are you Doing a Cleanse?


It seems a very trendy thing to do this year..  the "1 Week Cleanses" run from the lemon juice/cayenne pepper/maple syrup regimen to only having juice for a week or so, to a "clean eating" diet (no booze, coffee, and about 1200 calories of day of real food).   Since the liver is what does most the cleansing in your body, I think the best thing you can do is consume less toxins for the liver to cleanse... not just for a week, but always. And I just can't fathom starving myself for a week!

I have an alternative suggestion... how about cleansing your kitchen instead?  I'm not talking about getting out the oven cleaner.  I'm thinking of getting rid of the the toxic food in your kitchen, plus any old foods that might be cluttering your freezer or pantry,

The goal is to reduce the temptation to eat less than optimum foods, plus have a kitchen that is easy to work in and a pleasant place to be.

Day 1:  Get rid of any Christmas cookies, candies, etc.  Put away the Christmas mugs while you're at it.

Day 2:  Clean out the fridge.  Beyond the obvious (anything fuzzy, squishy veggies, old dairy), take a look at condiments.  Any mustard or salad dressing that you have not used up in a year or so you probably won't.  Look at labels... seriously consider getting rid of anything full of crap*.

Day 3:  Clean out the freezer.  Get rid of anything that is icy and/or freezer burnt.  I also recommend getting rid of anything that is over a year old as it has likely significantly degraded in texture and flavor (although well wrapped or vacuum packed items are better longer if in a chest type freezer that doesn't have a defrost cycle).  Get rid of (or give away) anything that you don't like (even if its free range organic no sugar added).  Look at labels... seriously consider getting rid of anything full of crap*.   Get things that need to be eaten in the next month or two to the top and front, and make a plan to eat them.

Day 5: Clean out the panty.  Same rules here.. even if its still good, if you haven't used in year, will you ever eat it?  Give it to the food bank before it expires. Look at labels... seriously consider getting rid of anything full of crap*. Also take a look at inventory. Do you really need 8 cans of tuna?  If you at most eat 2 cans a week of tuna and shop most every week, then 3 cans is probably plenty.

Day 6:  De-clutter... maybe not tackle the whole kitchen, but take on one or two things that bug you - that drawer that won't open because it's too full, the corner that is full of who knows what. Plus make a trip to the food bank if you excess canned or packaged food.  

Day 7: Make a meal using foods that are lingering in the fridge, freezer, and pantry, and a list of things to make and eat over the next few weeks.
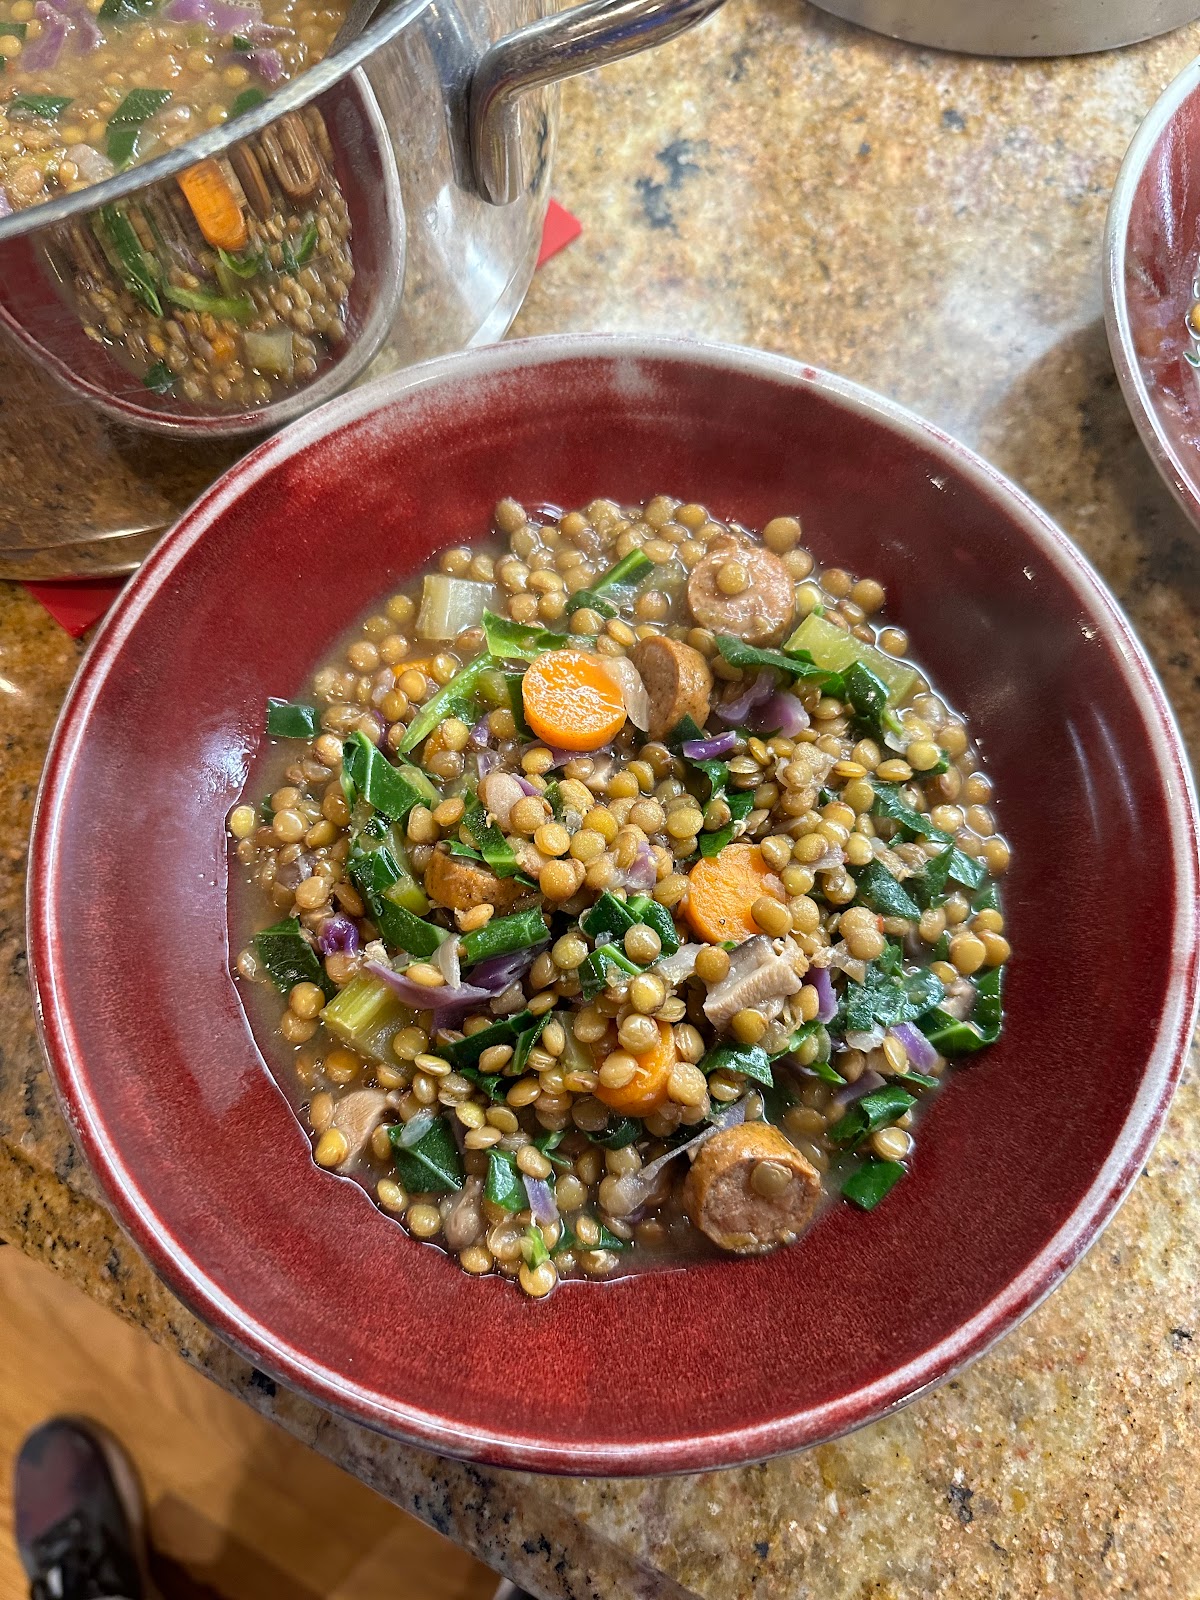
  Soups and stews can use up various meats and frozen veggies (in addition to broth that might be lingering in the freezer waiting for a rainy day), odd bits of pasta or bags of beans.

One of the things that seems to clog my freezer is broth.  Making your own broth is something that is considered to be essential for a serious cook, and most recipes seems to talk about making it a gallon at a time... using a big stock pot. And "bone broth" is trending as a super healthy food among the paleo crowd, it is supposed to be very good for healing the gut, restoring electrolytes, boosting the immune system, even getting rid of cellulite. There are even broth bars popping up where you get a cup of broth instead of coffee. I'm not sure that there have been any definitive scientific studies done, but can millions of grandmothers and their chicken soup be wrong?  

But I have come to the conclusion that making big batches of stock is just not worth the effort. Cooking it is not a problem... but straining, cooling, and storing a gallon of stock is just not easy in the standard home kitchen. And more often than not, when I go to make a soup, I end up reaching for the 1 liter box of broth in the cupboard because either 1) I don't want to spend an extra 15 minutes thawing the broth 2) the soup is so loaded with other highly flavorful ingredients that I don't want to "waste" good broth, or 3) I forgot there was broth in the bottom of the freezer.  But I do still make broth... but in small batches, once in a while.  A quart or two at a time, and usually use most of it the day or day after I make it.  I save chicken backs and innards from when I cut up chickens, plus chicken carcases from roast chicken. It all goes into zip lock baggies and stored in the freezer until I'm ready to make broth.  One thing I have learned (after doing a freezer clean-out, where there were a bunch of chicken bags) is that you need a lot of chicken parts relative to water to make good broth.

Chicken Broth

Chicken Backs, necks, giblets (from 1 or 2 chickens)...  optional: include the skin (I do)
and/or  Roast chicken carcass (Again, 1 - 2 chickens worth)
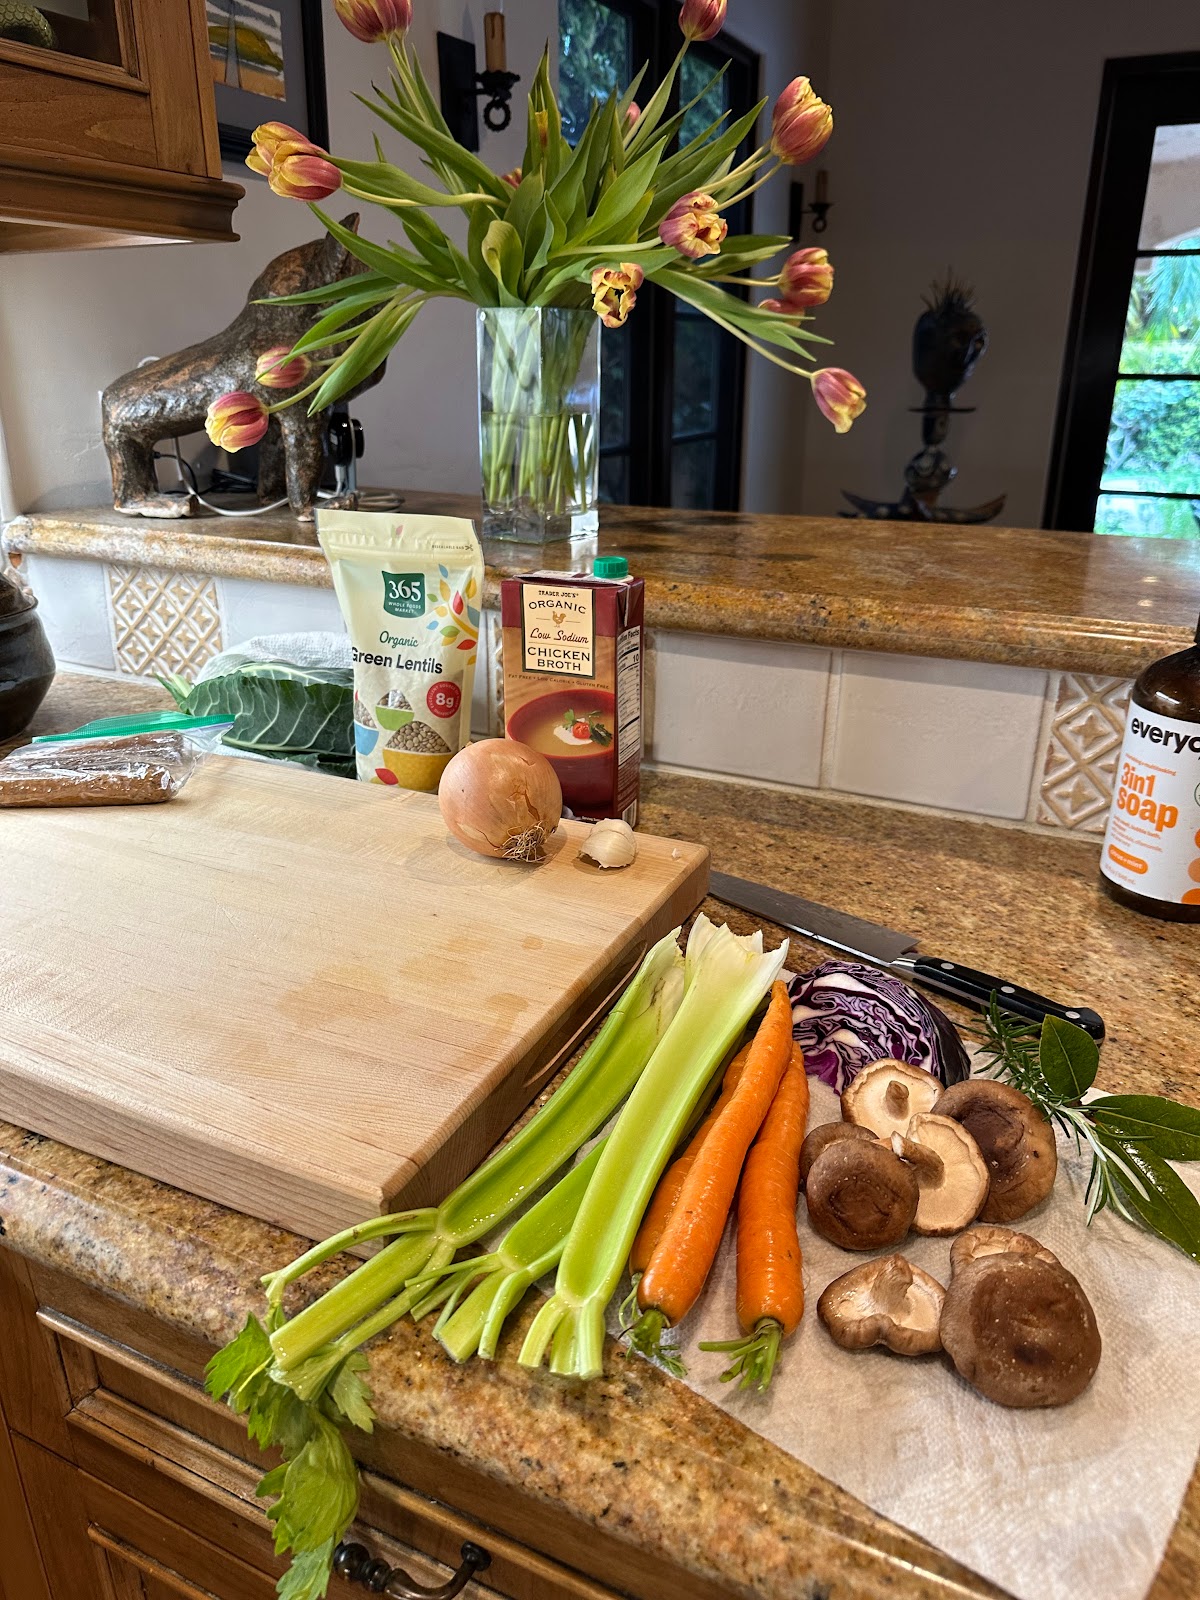
1 or 2 carrots, diced
1 small onion, diced
1 stalk celery, diced (optional)
A sprig or two of parsley (optional)
1 to 2 quarts of water
1/2 teaspoon of salt

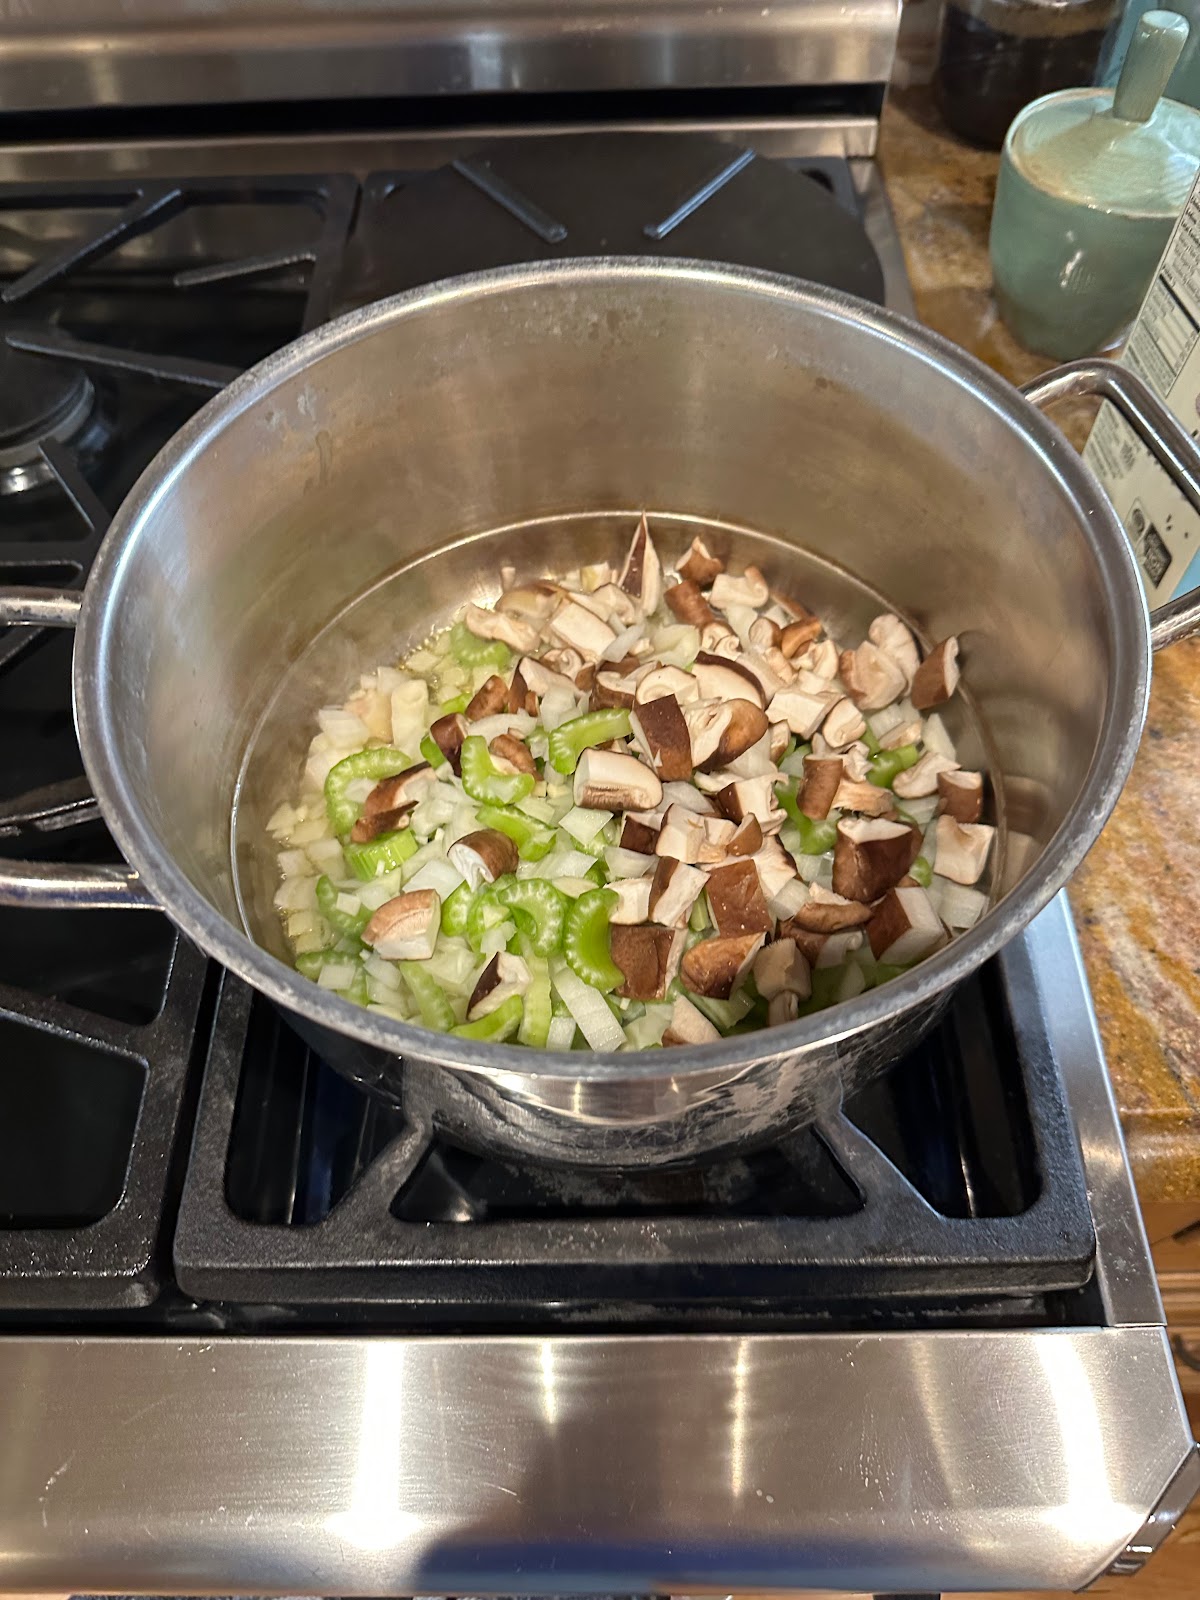
Put everything in a medium pot (no need to thaw chicken parts if they are frozen).  Add just enough water to cover.  Bring to a very low simmer (just a few bubbles) and cook for 3-4 hours.  Using tongs, pull out the big chunks and discard.  Strain the remainder into a large bowl.   You can either use the broth right away (and I don't bother to skim the fat), or chill.  The best way to rapidly cool is to put the bowl in a sink of cold water (adding ice makes it quicker).  When down to room temperature, cover the bowl and into the fridge. After its cold, skim the fat (which can be used to to saute some vegetables or fry eggs). It's best to strain again before using (and leave behind the sediment at the bottom). Store up to 3 days in the fridge, or to freeze, put broth (in 2-4 cup quantities) in 1 quart freezer ziploc's.

Now make some risotto or awesome chicken soup.  Or just have a cup of bone broth.

* CRAP:

C: Carbonated drinks
R: Refined sugars
A: Artificial sweeteners and colours
P: Processed foods

Wednesday, June 25, 2014

Bacon, Corn, and Chili Soup

I am not big on planning my meals ahead.  I go to the farmers market and buy what looks good, and generally figure out day by day what I'm going to cook.  I've written about this before, but one of the tricks to making this work is knowing good substitutions.  This week I had corn from the farmers market we had not managed to eat.  Soup sounded good (apologies to my friends in Phoenix, but "summer soup" is not an oxymoron in Coronado). I almost always have bacon in the freezer (you can just cut pieces off the frozen chunk, start cooking it slowly to thaw), and an onion,  But I did not have any milk or jalapeno peppers to make the corn soup I wanted. I did have coconut milk, and chipotle chili flakes. So I thinned the coconut milk with water (its very rich, more so than even half and half), used the chili flakes, and it came out very nice. 

There is a level of confidence and experience needed to pull off substitutions.  Google is also a good help for some things.  I find that onions, shallots, and leeks are pretty interchangeable, buttermilk can be faked with yogurt or milk with lemon juice or vinegar added.  Red peppers can substitute for tomatoes (for some dishes, its best to roast the peppers first).  I try to think through -- what will the texture / moisture or fat level / heat level / sweetness / color be like?  How different will the flavor be, and will the different flavor be different good or different in a bad way? Then just taste as you go along.  And remember that salt, acid (like lemon juice) and hot sauce can fix a lot of things that aren't quite right.

And now I have half a can of coconut milk to use up.  I have rum, but not any pineapple juice...

Bacon, Corn, and Chili Soup 

Serves 2 as main or 4 as appetizer

1 teaspoon olive oil
4 slices (about 4 oz) bacon, cut in ½ inch pieces
1 onion, chopped
1 clove garlic, minced
2 jalapeno chilies, minced or ¼ - ½ teaspoon chipotle chili flakes
Salt – about a ½ teaspoon or so to start
4 ears of corn, cut from the cob (or 4 cups of thawed, frozen corn)
1 cup of water
1 cup coconut milk
Black pepper, 3 or 4 good grinds
Hot sauce
Avocado or sour cream or yogurt to garnish, maybe a squeeze of lime
Chives or cilantro to garnish

In medium pot, cook the bacon in olive oil until crisp.  Remove bacon (but not the grease) from pan.  Add onions, garlic, and chilies to pan along with some salt.  Sauté until soft, 5 to 10 minutes.   Add corn from 3 of the ears along with the water, and cook for 5 minutes at a gentle boil.   Remove from heat, add milk, and blend with an immersion blender (or food processor if you like to do dishes).   Just blend a bit, still want some texture.

Add remaining corn and pepper.  Taste… add more salt and/or hot sauce as needed.  Heat back up to steaming (don’t boil) and serve with garnishes and reserved bacon.

Monday, January 21, 2013

Just 2 things...

I like to focus on what TO eat, as when you get into what NOT to eat it always seems so judgmental.  Or elitist.  And for the most part if you fill yourself with good stuff, you won’t eat as much bad stuff.   The only problem is that there is an entire industry trying to make bad stuff look good.  Not only to taste good, but even to seem healthy.  

If I had to pick just 2 things to eliminate from the diet of all my friends and family, it would industrial corn and soybeans.  In the US, corn and soy (unless organic) are mostly grown from genetically modified (GMO) seeds which are scary on several fronts (environment and health .. click this link for a long explanation), are subsidized by the government so they are cheap, and can be processed into a wide array of foods, many of which are on my “NOT to eat” list.

If you eliminate corn and soy, it takes out a lot of known junk foods: everything that has high fructose corn syrup (soda, a lot of cookies and breads, some crackers, some chips).  It also takes out one of the widely acknowledged evil foods, partially hydrogenated vegetable oil (the source of trans fats), and many of those unpronounceable ingredients in processed food:  Dextrose, maltodextrin, modified starches; sorbitol and xylitol and other artificial sweeteners.  

But it also takes out most meat: chickens, beef, pork are all fed a meal that is primarily made from GMO corn and soy meal (as well as other scary things, like antibiotics and arsenic).   One way around this is to eat organic meat.  Yes, you will pay a premium for this, but at least it is becoming more available.  But I’m willing to pay more (and eat less meat) from the reduced risk of antibiotic resistance bacteria, higher omega-3 fats from a grass based diet, and just some of the nastiness of industrial meat production.  Not to mention the issues from GMO foods.  The other way around this is to eat wild game.  I’m am fortunate to have some hunters in my family, and right now, a nice supply of elk.  

I’m still learning to cook very lean meat like elk. Grass fed beef also tends to be lean and sometimes tough.  Last week (those several days of honest to God freezing cold weather in Phoenix) I made up this mushroom soup, and added the elk at the very end, so it was just barely cooked.  It came out very nice.  This would also work well with grass fed beef.  


Mushroom Soup with Elk

Serves 4

1 package dried mushrooms (optional)
1 tablespoon butter
1 tablespoon olive oil
2 onions, halved and sliced (moon shapes)
¼ teaspoon salt
1 clove garlic, minced
1 ½ pounds mushrooms, halved or quartered 
½ cup wine
1 quart beef broth
1 – 2 cups of additional broth, mushroom water, or water
½ cup “10 min Barley” ** or other cooked or quick cooking grain
1 teaspoon fresh thyme or other herb
½ pound elk or other lean red meat, thinly sliced

** The barley is a new item from Trader Joes...  its dry, but precooked.

If using dry mushrooms, soak in a cup of boiling water.

Heat the butter and oil in a large pot, add onion slices and salt.  Saute until the onions are a bit browned (can do in 10 minutes over medium heat, but need to watch and stir often so as to not burn, or can do low and slow in 30 – 40 minutes).  Add garlic and mushrooms, cook until the mushrooms start to give up their liquid.  Add wine, scrape any brown bits from the bottom of the pan.  After the wine has reduced a bit, add the beef broth.  If using the dried mushrooms, chop and add, also add the soaking water (make sure to not get any grit).  Add more broth or water to achieve the desired “brothiness” for the soup.  Add barley.  Bring to a boil, cook for about 10 minutes or until the grain is done.  Add thyme and meat, stir to distribute meat.  Let soup heat a bit, but don’t bring back to a boil.  Serve.

Friday, January 13, 2012

Planning. Kind of.


It’s the beginning of the year, full of all sorts of resolutions to lose weight and eat better. And plenty of advice.  One common theme is planning your meals, which generally start “once a week, make a plan, shop with a list, blah, blah, blah.”  This worked great for my family when I was a kid.  We lived 30 miles from a real grocery store.  There were no farmers markets. Our weekly schedule was pretty routine (not to say I had a boring childhood).   Also when I was a kid, we didn’t have 20 or 30 places between work or school (or sports) begging you with big neon lights to stop and get something tasty to eat.  No McDonalds. No Olive Garden. No Starbucks. 

But this doesn’t work for me now: shopping at the local at the farmers market (plus 2 or 3 other stores to get what I want) plus travel schedules that aren’t predictable. A big lunch out and you’re not hungry or you swam 2500 meters and you’re starving. Not to mention an aversion to actually sitting down and making a plan!   

But that doesn’t mean you give into the neon lights.  You can eat better and cheaper at home AND tailor it to what is happening that day.  It takes a little work, yes, but possible.  Here is what works for me: 

1. Plan to not plan: Keep a reasonably stocked pantry. This does not mean be prepared for the big one.  It means keeping some dry grains and pasta on hand. Onions and garlic.  Eggs.  Meat products in the freezer (small portions, vacuum packed).  A few cans of beans and tuna. Some bread or tortillas. A chunk of cheese or two.   From this (and a few fresh vegetables) there are an infinite number of possibilities. 

2. Plan your day:   I don’t try to envision Thursday’s dinner on Sunday, but to try to think of dinner by lunch time on Thursday. Plan parts of the day: When I worked in an office, I took my lunch (and this was resulted in the first 5 pounds I lost). It means knowing some 5 minute options when you get home hungry at 7pm. On Saturday, don’t leave the house at 11am to run 3 hours of errands without eating lunch first.   

3. Keep everyone involved.  There are 3 parts to meals at home: shopping, cooking, cleaning.   Share the tasks. If at lunch you decide roast chicken would be great for dinner, also decide who it’s most convenient for to stop at the market and pick one up. (As a side note, I have learned large pieces of meat languish in my freezer, as I seem incapable of remembering 2 days ahead to let thaw).  I’m convinced the toughest part of “cooking for one” isn’t cooking.  It’s having to shop plus clean in addition to cooking. 

4. Get a routine.  I like to make pizza, and it’s a great way to use up bits and pieces of cheese, or an odd vegetable.   But I need to get blob (my starter) out first thing in the morning.  So we are in the habit of having pizza on Friday.  Back in my Intel days, we used to have fish or steaks on Fridays… It was the one day I didn’t have meetings with Asia (at 5pm), so I would stop at AJ’s (local upscale grocery) and buy something that looked good to throw on the grill, plus maybe a vegetable if I didn’t have anything left from the previous weekend.  Yeah, and a bottle of wine. 

5. Plan for leftovers. One trick to getting meals on the table quickly it to start with food that was already cooked.  Grilled chicken and leftover rice (plus cheese and a tomato or cabbage and hot sauce) can become a burrito.  Flake leftover fish, add some chopped onions, celery, dill add a bit of olive oil and a squeeze of lemon juice for a sandwich.  Use leftover pasta to make a frittata.  It can mean popping what you had a night or two ago into the microwave.  Learn what you like leftover, learn what you can freeze.  And learn what you don’t:   I can’t explain why, but we don’t like leftover stir fry.  I won’t reheat fish.  Steamed or sautéed broccoli gets nasty.   Soup and stews are about the best thing to reheat. Many are even better the next day.  Here is one of my recent favorites… it reheats well, and it freezes well (I put one serving in a 1 quart Ziploc baggie, press out the air and freeze.  To cook, I thaw a bit under hot water – at least enough to break it up, even better to leave in hot water for 10 minutes or so until thawed, put in the serving bowl and nuke until hot). 


Vegetable Bean Stew (with or without Sausage)

Make it soup by using more water or broth. 

1 lb beans (any kind).  Or lentils.
1-2 tablespoons olive oil.  
1-2 slices of bacon (optional, good if you don’t use sausage)
1 large onion, chopped
1 or 2 carrots, sliced (optional)
1 or 2 celery stalks, sliced.  If you have them. 
2 cloves of garlic
Pinch of red pepper flakes.  Or Chipotle flakes. Or more. Or Fresh chiles.
1 quart chicken broth (optional)

1 small butternut squash, peeled, seeded, cubed
1 package of cooked chicken sausage, sliced (optional)

1 bunch of greens (kale, mustard, chard), stalks removed, chopped (or baby spinach)

Herbs, lemon juice, salt, pepper, hot sauce to taste.

Rinse the beans in a colander, then put into a large pot and cover (by a couple of inches) with water.  They should soak at least 6 hours, but not more than 10 or so.  If you need to soak faster, bring the water to a boil then turn off the heat and let sit for an hour.  Drain and rinse the beans. Note: lentils don’t need to be soaked. 

In the same large pot, heat the oil.  Sauté the bacon if using.  Add onion, carrots, celery, garlic, chili.  When onions are translucent (5 minutes or so), add beans, broth, and another cup or 2 of water.  Or just use all water (5-6 cups).  Beans should be covered by a ½ inch or so.   Cook for 1 – 1 1/2 hours, or until just barely cooked (they should still have a little bite, but not crunch).  Lentils only need 20-30  minutes.  Add the squash and sausage. Add more water if it’s too thick.  If you don’t use sausage, add a good ½ teaspoon of salt.  Cook for another 20 minutes or so until the squash is done.   Add chopped greens.  Kale or mustard greens need to cook 5 to 10 minutes; baby spinach is done as soon as you have stirred it in.    Taste – add salt, maybe a squirt of lemon juice, herbs, some pepper, maybe some hot sauce as desired.    Sometimes I will serve with a dollop of yogurt (especially if meat-less), or some cheese.

Saturday, December 25, 2010

Merry Christmas!

This has become traditional at our house for dinner on Christmas Eve


Clam Chowder


8 SERVINGS TIME: 1 ½ hours

2 13 oz cans of chopped clams
2 cups potatoes, cubed
1 cup onion, chopped
1 cup celery, chopped

¾ cup butter
¾ cup flour
4 cups milk

1 teaspoon salt
½  teaspoon sugar
½ teaspoon pepper
½ teaspoon sage

Combine clam juice, vegetables, and enough water to cover. Bring to boil and simmer until vegetables are tender (30 to 40 minutes). 

Make white sauce:  Melt butter in medium sauce pan over medium heat.  Add flour, and stir to mix.  Cook for a few minutes.  Add milk slowly while stirring.    Cook, stirring constantly, until sauce starts to thicken (warming milk in microwave first makes this go quicker).  

Add white sauce to vegetable mixture.  Add clams and spices. Simmer for 15 minutes.  Serve hot.

Monday, December 8, 2008

Farmers market update -- and Minestrone Soup


The Ahwatukee farmers market is back into full swing, with lots of greens, tomatoes and other good stuff.   My latest step was been to join a CSA (community supported agriculture) called Love Grows Farms.  Basically, I pay in advance for a weekly box of fruit and vegetables every week.  I pick it up at the farmers market on Sunday (where I can conveniently get even more stuff if needed).  This helps provide a more stable market for the farmers, and provides me with an interesting variety of produce.  Here is was everything in this week’s box:

Minestrone soup is perfect to use up odd bits of vegetables (and leftovers).  The following may look like a recipe, but please only use as a guideline.  For sausage I use anything from a couple of links of Italian sausage (removed from the casing in little chunks) to leftover grilled chicken sausage, you can also just use some bacon or skip the meat altogether.  Sometimes I add some cut up winter squash (like butternut) instead of (or in addition to) zucchini squash, or add green beans. I generally don't use any tomatoes.  Add some herbs if you like….   You get the picture.

Minestrone Soup

Serves 6       Preparation Time:  1 hour or less

1/2 pound Italian turkey sausage or other sausage of choice, sliced crosswise
1 tablespoon olive oil
1 diced onion
3 cloves garlic, minced
1 cup diced carrots
1 diced red pepper
2 small zucchini, sliced
1/2 cup red wine ** optional
Other vegetables as desired
1 16-oz can whole tomatoes (crushed), with liquid  ** optional
3-5 cups chicken or beef broth
Salt and pepper to taste
1 16-oz can white or red kidney beans, drained and rinsed
1/2 cup rice or orzo (or 1 cup of leftover rice or pasta)
1 large bunch of greens (spinach, mustard greens, etc), chopped
Parmesan cheese, grated
Fresh parsley, chopped

Brown sausage in oil in deep saucepan or Dutch oven.  Add onion, garlic, red pepper and carrots plus a little salt.  Cook 5 minutes, add wine. 

Add zucchini, tomatoes with liquid, broth, and pepper.  Bring to a boil.  Reduce heat and simmer, covered, 15 minutes.  Add beans with liquid, rice, and wine.  Cook until rice is tender, about 20 to 30 minutes (less if already cooked). Add greens… If spinach, add just before serving, a bit earlier (~10 minutes) if using a stronger green that needs a bit of cooking to get tender.  

Here are some tasty (if weed-like) greens I like... for reference, that is my big knife:

Check seasoning.  Top bowls of soup with Parmesan and chopped parsley.

Monday, October 6, 2008

Signs of Fall

People who live where it really gets cold talk about “loving four seasons”.   Phoenix has four seasons too, you just have to look a little a little harder since you don’t have things like snow to make a point of winter, or a bunch of leaves suddenly turning red because you had your first frost.   I will admit that fall is the hardest season to detect in Phoenix, but today it finally seemed like summer is behind us.  We have had some clues:  Halloween decorations are starting to show up in front yards, they are starting on the long process of putting Christmas lights up on Chandler (which they fortunately do not light until after Thanksgiving), but this was the first weekend we actually had the air conditioners off in the middle of the afternoon!    Which means that maybe we can actually start thinking about soups and stews… even if it still supposed to be back to the high 90’s next week.

Here is a very quick soup to make – it really only takes about a ½ hour, and its packed with protein and is a bit different. 

Chinese Chicken and Corn Soup

1 boneless skinless chicken breast
2 tablespoons dry sherry
½ teaspoon sesame oil
3 tablespoons cornstarch (divided)
1 clove garlic, minced
1 tablespoon thinly shredded fresh ginger
1 teaspoon vegetable oil
1 quart chicken broth
1 package firm tofu (12 – 14 ounces), cut into ½ inch squares
1 ½ cups frozen corn
1 egg
½ cup thinly sliced green onions
A bit more sesame oil
Salt and pepper to taste

Slice breast crosswise into ½ inch strips.  In a small bowl, mix chicken with wine, sesame oil, and 1 tablespoon cornstarch.   In a medium pot, heat the oil over medium high heat, add the garlic and ginger, then add the chicken mixture.  Let cook for a while, stir (yes, this will stick to the pan*, use a sharp spatula). 

When chicken is brown, add broth and bring to a boil.  Add the tofu and corn and return mixture to boil. 

In a small bowl, blend remaining 2 tablespoons cornstarch and ¼ cup water until smooth, add to soup and stir until it returns to a boil.  In the same small bowl, beat egg to blend, then pour slowly into soup, stirring to form thin strands.  Add green onions, a bit more sesame oil, salt and pepper to taste.  Serve immediately.

* original recipe recommends a non-stick pan, but I don’t have any non-stick pots (just my 10-inch sauté pan which is routinely used for eggs).