Vegetables Every Day

Vegetables Every Day
Carrot Tarator with Beets

Sunday, February 1, 2009

Peasant Food

So much for posting every Sunday or Monday on “what in the box” … its Saturday, Sunday, I am thinking I really need to get around posting on what to do with the turnips we got 2 weeks ago.  At least turnips keep!

I’m not sure if you can get a vegetable any more “peasant-ish” than turnips, and mussels might be the protein equivalent.   So I paired the two up for a nice dinner.   To someone who grew up in the desert, mussels are a bit scary.  Most recipes talk about de-bearding, getting the sand out, etc.  But mussels today (at least when you get them at AJ’s) are already clean.  The only trick is to make sure they are alive.   Make sure you buy them the day you cook them (the person at the fish counter will sort usually sort through and get live ones).  When you get them home, open the plastic bag so then can breathe.  I put the bag in a bowl with some ice, and a wet paper towel on top and keep them in the fridge..  When you are ready to cook, rinse in a colander, and get rid of any that don’t close.  You might need to tap them to make them close – those are still OK.   Then put into the pot and cook (see below)… and if any don’t open, don’t eat.  It’s really pretty simple, and they are so good.  And good for you!   Don’t forget some bread to soak up the broth.

Mussels Sailor-Style (if you are a French Sailor)

Adopted from Jaques Pepin’s Complete Techniques.  Figure a little under 1 pound of mussels per person for a main dish.

2 - 5 lbs mussels
1 cup chopped onions
1clove garlic, peeled, crushed and chopped
½ cup chopped parsley
½ teaspoon freshly ground pepper
Dash (or sprig) of Thyme
1 bay leaf
Dash of salt
2 tablespoons butter
1 cup white wine

Combine all ingredients in a large pot, cover, place on high heat and bring to a boil.
Keep cooking for about 10 minutes.  Twice while they are cooking, lift the kettle with both hands, your thumbs holding the cover, and shake the kettle in an up-and-down motion to toos the mussels.  They should all open.  Do not overcook or they will toughen.  Serve in shallow bowls with some of the broth on top.   Save (and freeze) any extra broth for fish soup.


There was a great recipe a while back in Fine Cooking on how to roast vegetables… practically any vegetable (from peas to cauliflower to squash to root vegetables) like turnips!  I added a carrot to the turnip for some color..

Roasted Turnips and Carrots
First, heat the oven on to 450 – 475F.  Trim and peel a turnip (or two), start with about a pound plus a big carrot for some color.  Cut everything into ¾ to 1 inch pieces. Put on a cooking sheet covered with parchment, add tablespoons or so of olive oil and a bit of salt.  Mix to distribute the oil.  Spread evenly, and put into the oven.  After 10 minutes, stir and make sure chunks are turned.  Cook for another 10 or 15 minutes, until tender and done.  They should have brown spots and edges.  Remove from the oven, add some more salt (some finishing salt  if you have it), and maybe a squirt of lemon juice (hey.. this was in this week’s box!)   Serve hot.

Monday, January 19, 2009

I never knew Kale was so good!

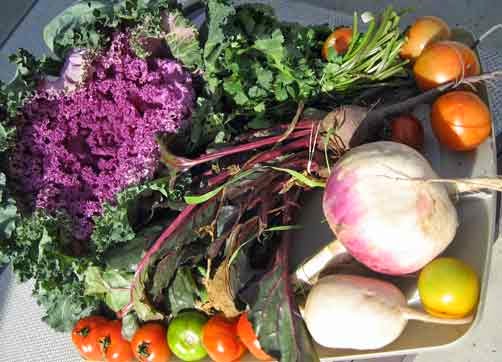
Here’s what I got this week in my CSA box from Love Grows Farms:

Kale, beets, one huge (and one normal size) turnips, tomatoes, cilantro, apples, and green onions  (although somehow the apples and green onions didn’t get into the picture). I love getting something new  like the kale;  the pink - purple leafy thing in thing on the left(although I am becoming dependent on good tomatoes every week).    One of my go-to sources on vegetable is Alice Waters  Chez Panisse Vegetables:  "Kale comes in a lot of shapes, sizes and colors, and is in the  mustard family ... (includes broccoli and cabbage) ...   It’s best after there has been some cold" (remember those frigid temperatures around Christmas where it ALMOST froze? ), anyways…  it was excellent!  I made this tonight, along with some Pasta Carbonara.  Surprise:  it keeps its color when cooked!   

Sautéed Kale with Garlic and Vinegar
1 Bunch of Kale
1 Tablespoon olive oil
Salt
1 clove garlic, smashed and chopped
1-2 teaspoons sherry or red wine vinegar
Cut the tough stems from the kale, coarsely chop, and wash in plenty of water.  Drain, but don’t spin dry.
Heat oil in a large sauté pan.  Add enough kale to cover the bottom of the pan.  Allow the greens to wilt a bit before adding more. When all the kale has been added, season with salt, stir in the garlic, and cover the pan.  The greens will take anywhere from just a few minute to 15 minutes to cook (mine took about 10 minutes over relatively low heat),  When they are tender, remove the lid and allow any excess water to cook away.  Turn off the heat and stir in the vinegar.  Serves 2-3 (original recipe was double this).


Other ideas for the week:
Roasted Turnips – peel, cube, toss with a bit of olive oil and roast in a hot (450F) oven. Expect they will take 20 minutes or so depending on cube size, finish with a bit of salt and pepper.
Beets (and cilantro) – I came across a recipe for a beet and carrot salad in one of my favorite food blogs, Zucchini and Chocolate and will try it this week.   The beets are used raw… seems like a lot less bother than roasting or steaming. [edit: not recommended!]
Beet and turnip greens – into some soup… either bean or lentil – vegetable.
Tomatoes, cilantro, green onions - sounds like a great start for salsa (luckily I have a chili pepper left from Crooked Sky Farms  from last week).

Green onions – have already gone into Pasta Carbonara (translation: pasta with bacon and eggs.  Let me know if you want the recipe.)

One of the challenges of getting all your vegetables once a week is to keep everything fresh the week or so until it’s used.   I try to do some work when I get home from the farmers market to keep everything fresh and to make it a bit easier to cook later in the week. 

Tender greens (lettuce, cilantro, arugula) get a wash and spin dry, then spread on paper towels. I pick out any bruised or otherwise undesirable leaves,  then place in a plastic bag (with the paper towels), and into the crisper.


Root vegetables that are dirty get a wash (sometimes outside if really dirty), left on the counter to dry, then into plastic bag and into the fridge. I also remove the tops from things like beets, turnips, and carrots.   I wash the greens, spin, and wrap.   Here are the beet and turnip greens from this week.
     Enjoy!

Saturday, January 17, 2009

New Feature: Eating seasonally in Phoenix -- ideas for this week's CSA box

I am going to try to do a weekly update on my Love Grows Farm CSA box , with ideas and recipes to use the weeks bounty.  Plus identify unusual items. I am hoping that other customers of Love Grows Farm and other Phoenix-area CSA participants will read, comment, and share their ideas as well.  Please don’t be shy!  I think we can all use some inspiration; it seems that most of the food magazines and web sites are talking about making stew, braised short ribs and bread, not how to use wonderful tomatoes and greens!  Not to mention what to do with the pile of citrus we seem to be getting from friends, family and our own tree.
Last week’s box included salad greens, spinach, arugula, green onions, kohlrabi, lemons and oranges, and of course, tomatoes.

New is the box this week was kohlrabi, something I had never had before.  Kohlrabi is German for “cabbage turnip”, and is a member of the cabbage family.   They can be eaten raw or cooked.  Most recipes I saw called just to use the bulb part (trimmed and peeled), but the leave can also be eaten.   I ate mine raw, in a salad (I didn’t use the leaves, it was mid week by the time I got too them and they were wilted.  It’s similar to very tender broccoli stems.   I’m hoping to get more, to try cooked as well.   I think the leaves would go good in soup.
My recipe for this week (and inspiration to try to do this weekly) was a salad I made on Sunday for friends.  It was quite wonderful..  I wish I had remembered a picture (so much for my New Year’s resolution to take more pictures).
I actually used 4 things from the box for this one simple salad – greens, scallions (green onions), lemons and oranges.  I served on my new stainless steel platter I got for Christmas, and it looked marvelous as well.

Orange Salad 

Serves 4

1/3 cup walnuts (slightly broken up)
Two oranges
Large bowl of greens (guess about 8 cups, or 1 bag of baby greens)
Lemon – oil dressing (see below)

Toast walnuts. (I use the toaster oven – place on a piece of foil on tray, and 1 cycle through toast, or you can do in a dry skillet over medium-high heat, will take just a few minutes… whichever way, keep an eye on them - you want a light toast, not too brown).

Prepare the oranges:  cut of the ends, then cut off the peel.  You can either cut out the segments, or for a faster prep, just slice.  Remove any seeds.

Assemble:  toss the greens with the dressing, it should only take a few tablespoons.  Place greens on a platter.  Arrange orange segments (or slices) over top, and sprinkle walnuts over top.  Serve immediately.

Lemon – Oil DressingI adopted this from a Julia Child recipe (from the Julia and Jacques cookbook, unfortunately, its out of print)

1 tablespoon minced scallion
Zest from 1 small orange (optional)
2 teaspoons Dijon mustard
2 - 3 tablespoons freshly squeezed lemon juice
¼ teaspoon salt
Freshly ground black pepper
1/3 to ½ cup excellent olive oil

Put scallions, mustard, lemon juice, salt and pepper in a small bowl and whisk until blended (or use immersion blender).  Pour in the oil slowly, droplets at first, then in a thin stream, whisking constantly until the oil has been completely emulsified and the dressing has thickened.  Taste and adjust the seasonings.  Best used immediately,  store remainder in the refrigerator for a few days at most.

Monday, January 5, 2009

Holiday Splurge

We have had a lot to celebrate this holiday season, in addition to Christmas and New Years, one of my loyal blog followers celebrated her 75th birthday. For the birthday, we had a little family get together for dinner, with rack of lamb, roasted squash, and orzo. The hardest part of the dinner was peeling butternut squash… which was good since I made a trip out to the Phoenix Botanical Gardens (along with my visiting sous chef), and didn’t get home until 4:40 (and people were invited over at 5-ish for a 6-ish dinner). A quick digression -- the Chihuly exhibition in the garden is really worth the trip, I will be going again (after the bowl games and during the week). Thankfully, one of the guests brought some yummy appetizers (including chopped liver, which I didn't even know I liked).

Butternut squash is easy to roast once the peeling is done.  After peeling, removing the seeds, and cutting into cubes, just put on a large sheet pan prepared with a piece of parchment paper, add some olive oil (not too much, maybe a tablespoon per medium/ large size fruit), salt and pepper, and pop into a hot oven (425/450) for a half hour or so.

The orzo is even easier… just cook like rice.  I use 2 parts liquid to 1 part orzo, (the liquid can be water or broth or a mix… just remember to add salt if you use mostly water). After bringing the liquid to a boil, add orzo and cook (covered) until it’s done, most of the liquid should be absorbed. Finish with a sprinkle of herbs and olive oil (alternately, butter or Parmesan cheese could be added).

The star is the rack of lamb. I did 2 1/2 racks for 7 of us (which worked just right, there were a couple of chops left for a salad the next day).  Warning… if you spend more than $100 on one package of meat at AJ’s, the cashiers screen flashes red, with a note to the effect “are you sure this is correct?”

The only trick on the lamb is to cook to the right point.  The lamb should still be nice and rosy pink inside. If your racks are on the small side (or – if doing for 2 and splitting one rack to still allow interlacing the bones), pull a couple of minutes early and check the temperature. If you don’t have a instant read thermometer (or like me, don’t trust the one you have), the “squishy-ness” of the meat is also a good indicator, just like when you are grilling a thick steak. They are quite pretty on a platter, with a few sprigs of rosemary tucked around. My New Years resolution -- take more pictures!

Roast Rack of Lamb with Herb Coating

Serves 4 - 6

2 racks of lamb
1 cup fresh French bread crumbs (put big cubes of bread in the Cusinart)
1 tablespoon chopped fresh rosemary
1 teaspoon chopped fresh thyme
¼ cup chopped fresh parsley
Salt and freshly ground pepper
2 tablespoons Dijon mustard

Place the racks in a roasting pan with a rack, facing each other with the meaty chops on the bottom.  Interlock the bones to support.  Roast in a preheated 450F oven for 25 minutes.

Meanwhile, mix together the bread crumbs, herbs, and salt and pepper. Pull the roasting pan out of the oven. Paint all sides of the lamb with mustard. Turn the racks so the meaty side is facing out, with bones together at the top. Press the bread crumb mixture onto the surface. Put back into the oven for another 10 minutes*. The outside crumb coating should be lightly browned and the meat rosy. Internal temperature should be 135 – 140 F.  Let rest for 5 minutes. Cut into chops and serve.

* plus or minus a couple of minutes.  Pull early and check the temperature.

Monday, December 8, 2008

Farmers market update -- and Minestrone Soup


The Ahwatukee farmers market is back into full swing, with lots of greens, tomatoes and other good stuff.   My latest step was been to join a CSA (community supported agriculture) called Love Grows Farms.  Basically, I pay in advance for a weekly box of fruit and vegetables every week.  I pick it up at the farmers market on Sunday (where I can conveniently get even more stuff if needed).  This helps provide a more stable market for the farmers, and provides me with an interesting variety of produce.  Here is was everything in this week’s box:

Minestrone soup is perfect to use up odd bits of vegetables (and leftovers).  The following may look like a recipe, but please only use as a guideline.  For sausage I use anything from a couple of links of Italian sausage (removed from the casing in little chunks) to leftover grilled chicken sausage, you can also just use some bacon or skip the meat altogether.  Sometimes I add some cut up winter squash (like butternut) instead of (or in addition to) zucchini squash, or add green beans. I generally don't use any tomatoes.  Add some herbs if you like….   You get the picture.

Minestrone Soup

Serves 6       Preparation Time:  1 hour or less

1/2 pound Italian turkey sausage or other sausage of choice, sliced crosswise
1 tablespoon olive oil
1 diced onion
3 cloves garlic, minced
1 cup diced carrots
1 diced red pepper
2 small zucchini, sliced
1/2 cup red wine ** optional
Other vegetables as desired
1 16-oz can whole tomatoes (crushed), with liquid  ** optional
3-5 cups chicken or beef broth
Salt and pepper to taste
1 16-oz can white or red kidney beans, drained and rinsed
1/2 cup rice or orzo (or 1 cup of leftover rice or pasta)
1 large bunch of greens (spinach, mustard greens, etc), chopped
Parmesan cheese, grated
Fresh parsley, chopped

Brown sausage in oil in deep saucepan or Dutch oven.  Add onion, garlic, red pepper and carrots plus a little salt.  Cook 5 minutes, add wine. 

Add zucchini, tomatoes with liquid, broth, and pepper.  Bring to a boil.  Reduce heat and simmer, covered, 15 minutes.  Add beans with liquid, rice, and wine.  Cook until rice is tender, about 20 to 30 minutes (less if already cooked). Add greens… If spinach, add just before serving, a bit earlier (~10 minutes) if using a stronger green that needs a bit of cooking to get tender.  

Here are some tasty (if weed-like) greens I like... for reference, that is my big knife:

Check seasoning.  Top bowls of soup with Parmesan and chopped parsley.

Thursday, November 20, 2008

Deconstructed Turkey

I know a lot of you figure that I put my recipes on my blog to either a) show off or b) provide a public service (and I don’t need votes to know where most of you stand on this).  But the real reason is so that when I go to someone’s house and cook, I can look up on the web how I cook things, especially details on times and temperatures.

I have done my last several turkeys using this method Based on Julia Child and Jacques Pipen’s Cooking at Home Series.  Basically, you cut the turkey up a bit before roasting.   There are many advantages to cooking a turkey this way:

1)     You can actually get something else in the oven with turkey
2)     The broth (and resulting stuffing, gravy, and soup) is awesome
3)    The thighs are easy to slice, and very impressive with the stuffing in them
4)    The bird cooks in 2 hours **


I have not tried to do a big turkey this way, generally just the 12-14 pounders.  Here is an abbreviated set of instructions, which will help me if it’s your house I’m cooking in.  Unfortunately, the cook book is out of print.   But if you have questions, just call… or leave a comment.  Maybe next year I will have pictures.

 ** At 400 degrees in a convection oven, it will cook in just over an hour ...  which I demonstrated last year at my brothers.

 Turkey prep (12 - 14lb) and stock:

Cut off both legs, with thigh attached. Get the chunk of meat from the back when cutting the thigh.  De-bone the thigh, but not the leg. Cut the back off the breast. Remove the wishbone.  Remove fat from breast flap, but leave the skin on. Leave the wings on. 

Use back, neck, and giblets to make stock.  Brown the meat, add 2 carrots, 2 stalks of celery, 1 onion, (all roughly chopped), and a big handful of herbs.  Add 2-3 quarts of water plus salt and pepper.  Cook over low for 4 hours.  Strain, cool.  Keep the giblets if desired.

Stuffing:

1 bag Partridge Farms cubed stuffing (or make your own bread for stuffing)
½ ounce dry mushrooms <I used black trumpets>, reconstituted in ~ 1 cup boiling water.
Stain mushrooms, reserve liquid, rinse if needed.  Chop mushrooms and add to stuffing.  Add most of liquid, careful to not get any grit at bottom.

Meanwhile, sauté in a couple of tablespoons of butter:
½ pound mushrooms (sliced)
1 shallot (diced small)
½ a large onion (diced)
2 stalked celery (diced small)

Add to stuffing, along with ~ ¼ cup of chopped herbs (parsley, thyme, sage, etc).
Add ~2 cups of broth, or until moist.


Roasting:

Stuff the thighs and tie with string. Tuck wings back on the breast.  Make a pile of stuffing, put the breast on top. Put some stuffing in front cavity of breast.  Put the thighs/legs next to the breast in the pan.

Roast at 325 F for ~2 hours.

Saturday, November 1, 2008

Chimichangas

This is a hard time of year to figure out “what’s for dinner”.   We are tired of salads and things tossed on the grill that we have been eating all summer, but since its been in the 90’s, it still doesn’t’ seem right to have soups and stews.  If you ever lived in Tucson, you will remember these giant deep fried burritos.. served enchilada style for a real gut buster.

So, this is not the same thing, not at all.  But they are very good, easy to make, and great for getting out of the dinner rut.


The original version called for jarred salsa, but I generally make with a mix of red peppers, green chili’s, and onions to keep them tomato free.  Either way is good.  I tend to use more vegetables than called for (big surprise). I usually do it without meat, but  if you happen to have some leftover grilled or roasted meat  you can chop it up and through it in too.

Baked Veggie Chimi’s

3 servings

1 can (15 oz) black or pinto beans, drained and rinsed
2 tablespoons sliced olives
1 can (7oz) diced green chilies
½ cup (+) of shredded cabbage or coleslaw mix
½ cup shredded sharp cheddar cheese
½ cup roasted (or not) red pepper (from a jar is OK), diced *
4 green onions, sliced thin  *
2 tablespoons cilantro *
Cumin or chili powder to taste *
3 flour tortilla’s (large) or 4 or 5 if they are medium or small
* or can use ½ cup of salsa

Garnish (pick a couple):
Sour cream or Plain yogurt
Shredded cabbage mixed with cilantro
Sliced avocado
Salsa

Pre-heat oven to 425F.

In a bowl, mix everything up to the tortilla’s.  Heat the tortilla’s in the microwave (about 30 sec).  Put 1/3 of the bean mixture in a tortilla and wrap. Put seam side down on a lightly oiled baking sheet or parchment paper. Repeat with remaining tortillas.  Spray or brush or rub chimi’s lightly with olive or other oil. Bake until crisp and brown, about 15 minutes. Top with garnishes.